Guide Overview:
This guide offers a step-by-step walkthrough on how to create a custom build of the CometChat Widget. By doing so, you can apply specific tweaks or modifications to the widget’s default behavior, enabling you to better align the chat experience with your unique business requirements and user expectations.
Pre-requisite:
Node v16 or below is needed while generating a build for the widget using the command:
npm run build:custom
Node version above 16 will throw an error while using the above command
Before proceeding further, let’s take a moment to understand the folder structure of the CometChat Widget. This is the project you’ve cloned from our official GitHub repository using the following command:
git clone https://github.com/cometchat-pro/web-chat-widget-custom
Familiarity with this structure is crucial, as it will help you locate and modify the necessary files while creating your custom build.
Folder Structure:
-
Once you’ve cloned the repository, you’ll see a folder named web-chat-widget-custom in your local environment.
-
Open this folder using your preferred code editor (such as VS Code).
-
Inside this folder, navigate to the CometChatWorkspace directory. Locate the CONSTS.js file, and update the URL value to point to your website’s URL. This step ensures the widget communicates correctly with your custom deployment.
// EG: If URL is set as https://your_domain.com/widget // cometchatwidget.js will be available at https://your_domain.com/cometchatwidget.js module.exports = { URL: "https://your_domain.com", } -
Now, run
npm ito install the dependencies. -
At the following path, you’ll find the relevant code snippets that power the components displayed in the default CometChat Widget:
CometChatWorkspace/src/cometchat-pro-react-ui-kit/CometChatWorkspace/src/components
Some customization examples:
1. Filtering conversations based on either user or group tags:
Navigate to the controller.js in CometChatConversationList:
Chats/CometChatConversationList/controller.js
Update the conversations request builder for additional filtering:
default:
   this.conversationRequest = new CometChat.ConversationsRequestBuilder()
      .setTags(Tags)
	  .withTags(true)
	  .setLimit(30)
	  .build();
	  break;
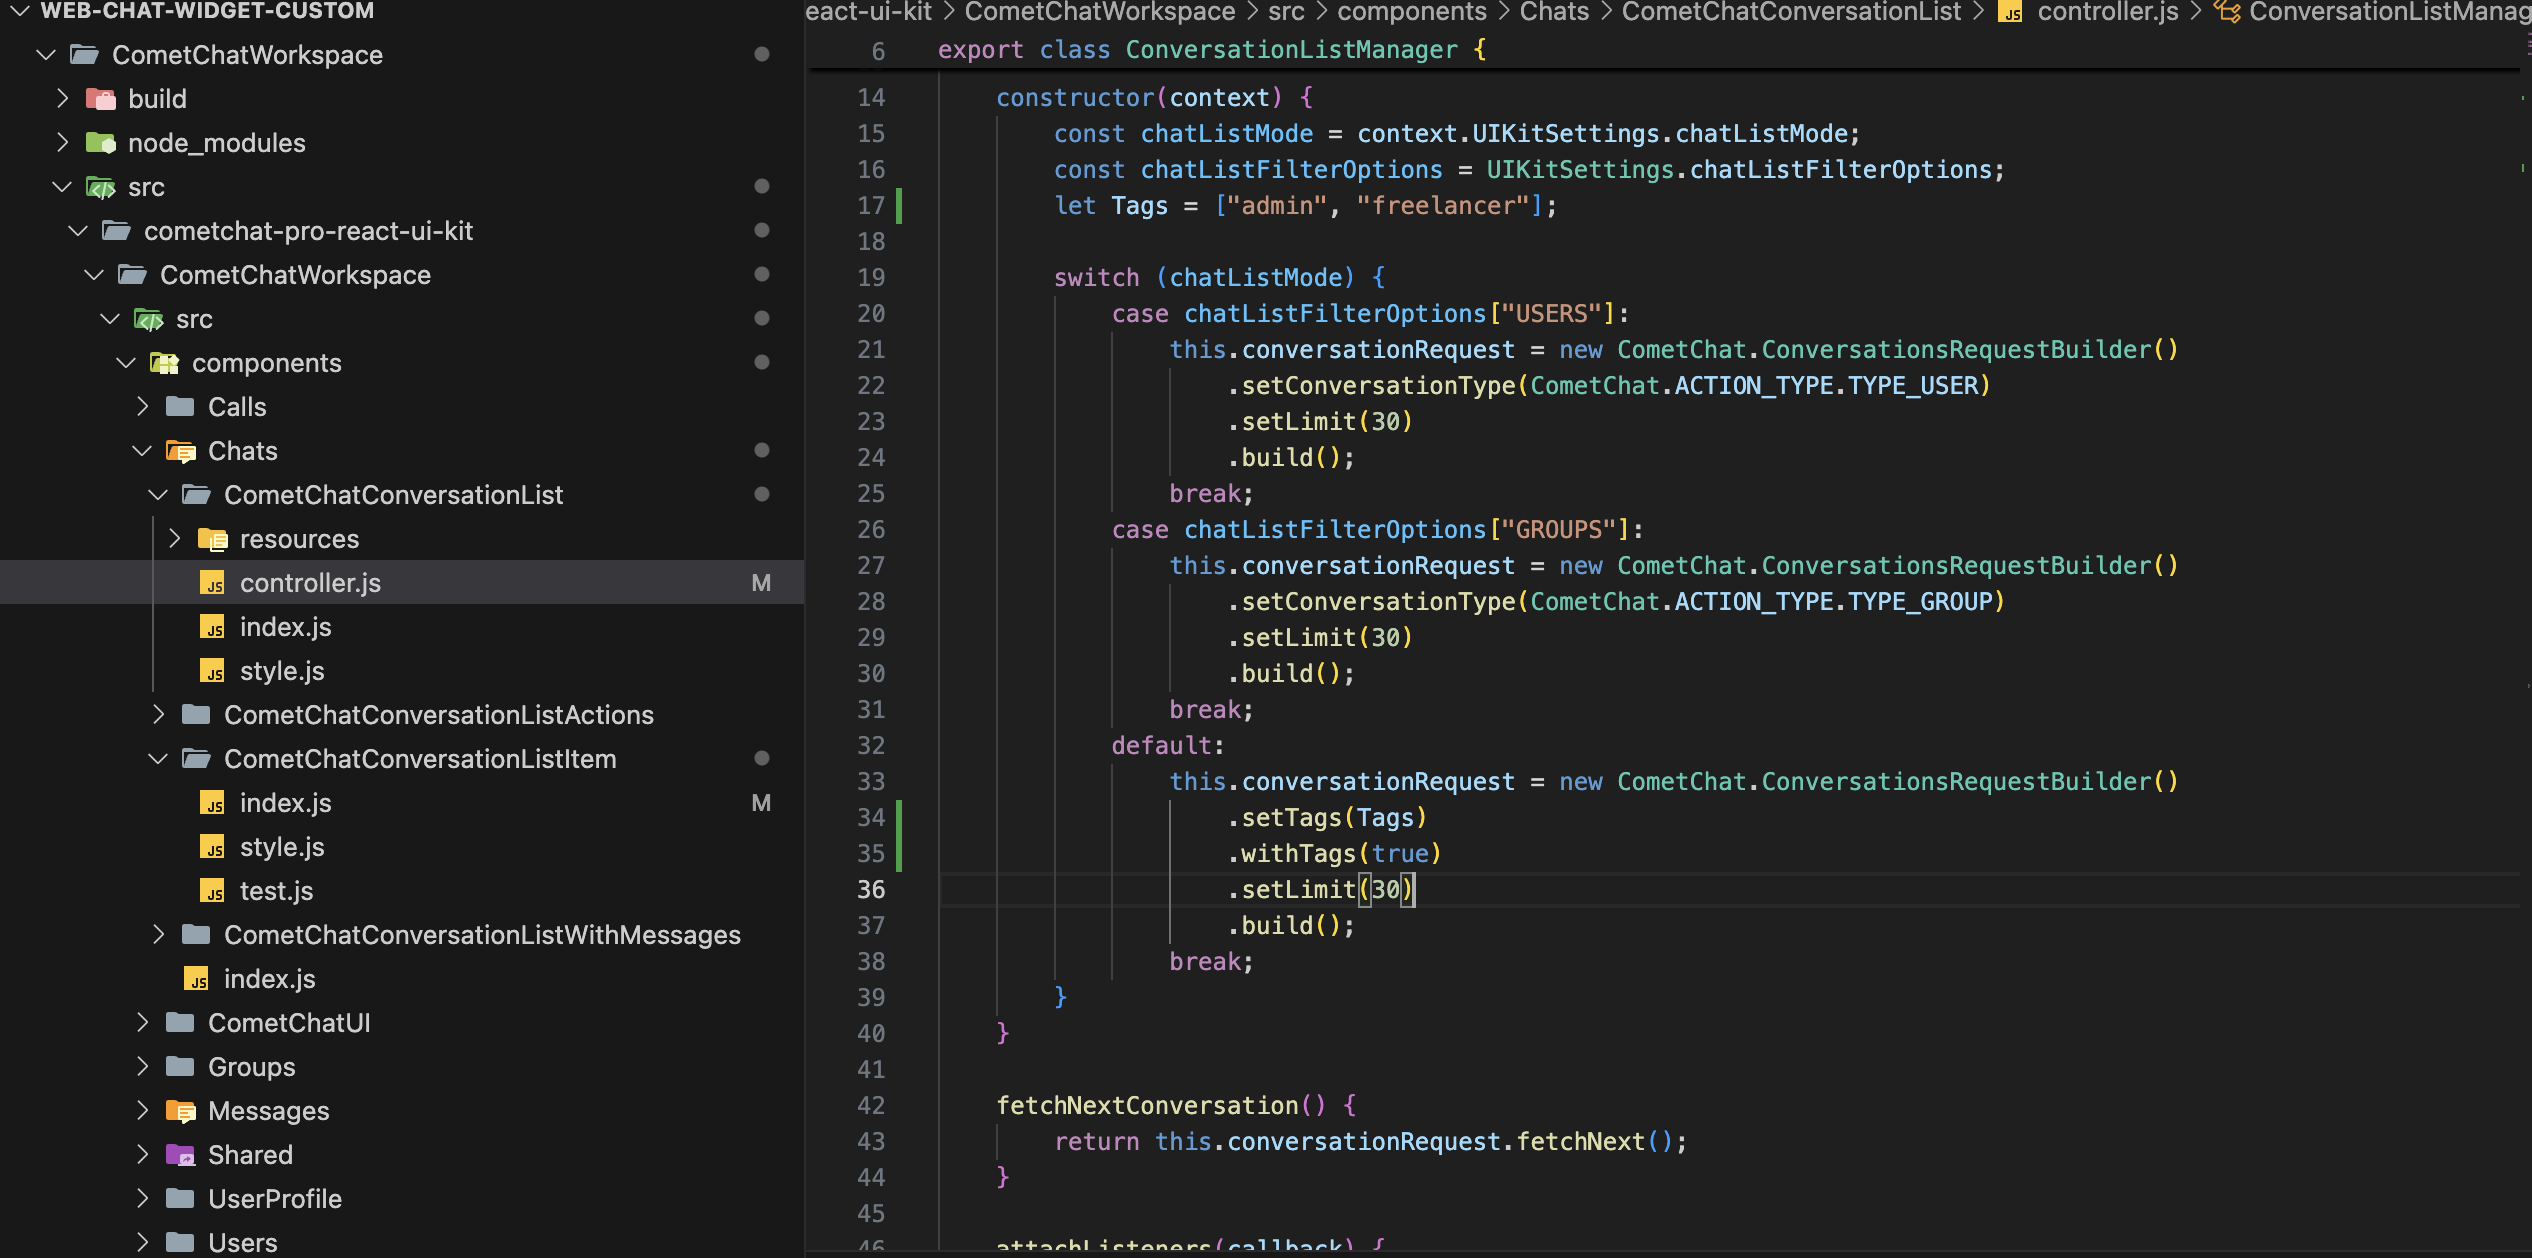
Now, navigate to
CometChatConversationListItem/index.js to customize the listItemView and show the users with tags. For this guide we have shown the tags just below the last message, you can render it anywhere as per your need.
<div
   css={itemLastMsgStyle(this.props)}
   className='item__details__last-message'
   onMouseEnter={(event) => this.toggleTooltip(event, true)}
   onMouseLeave={(event) => this.toggleTooltip(event, false)}
>
	{this.state.lastMessage}
	{this.props.conversation.conversationWith.tags &&
		this.props.conversation.conversationWith.tags.map((tag)=>{
			return(
			<div className="tag" style={{display:'flex', gap:'4px'}} key={tag}>
				{tag}
			</div>
			)
		})
	}
</div>
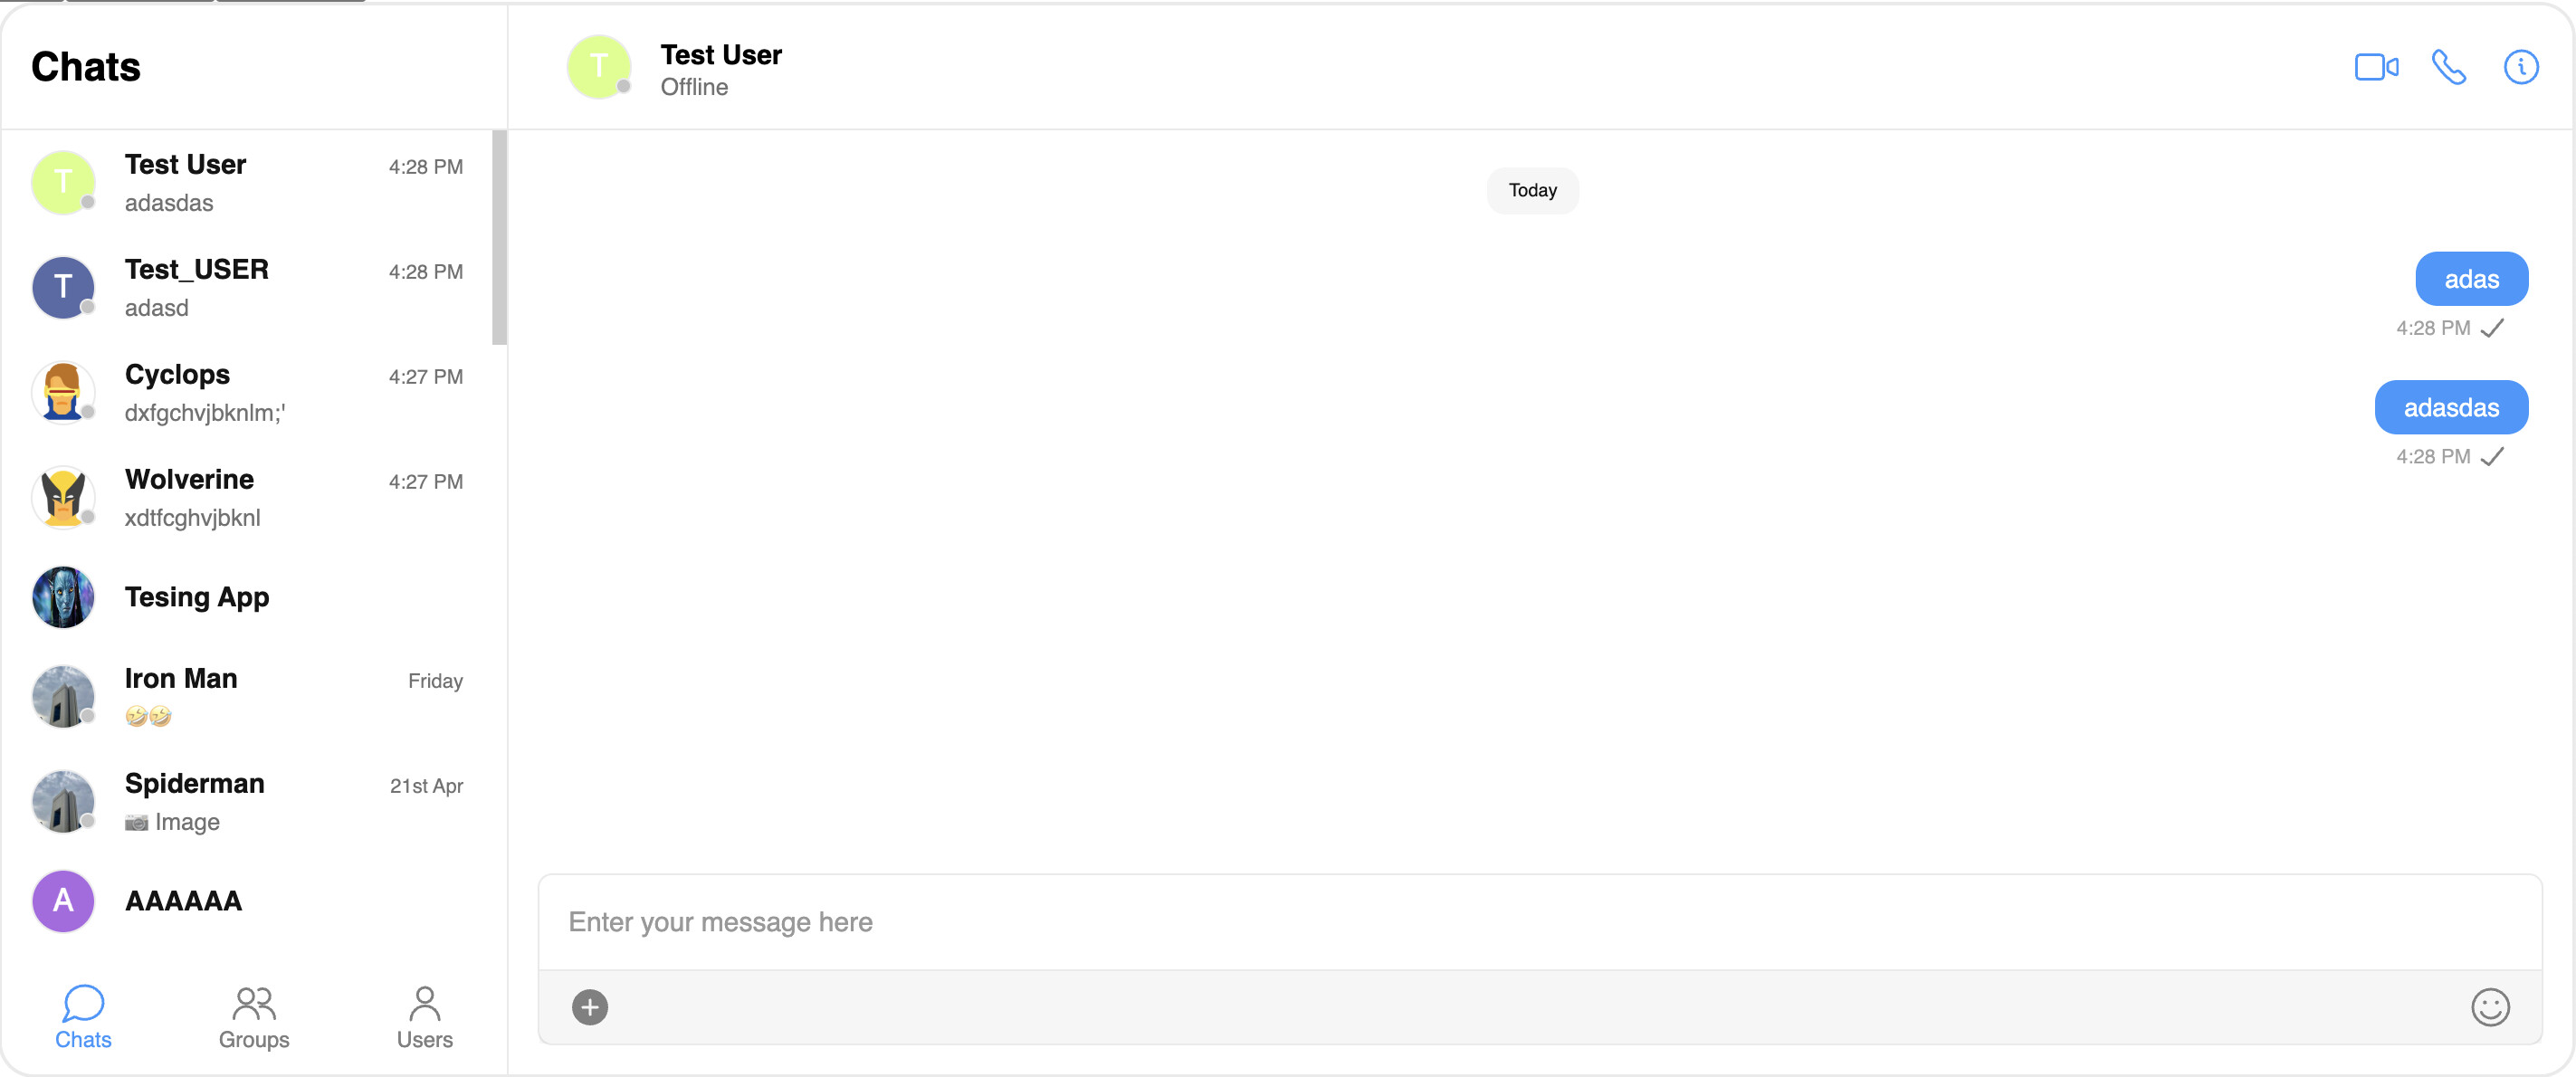
Default View:
Filtered Conversations based on
freelancer tag: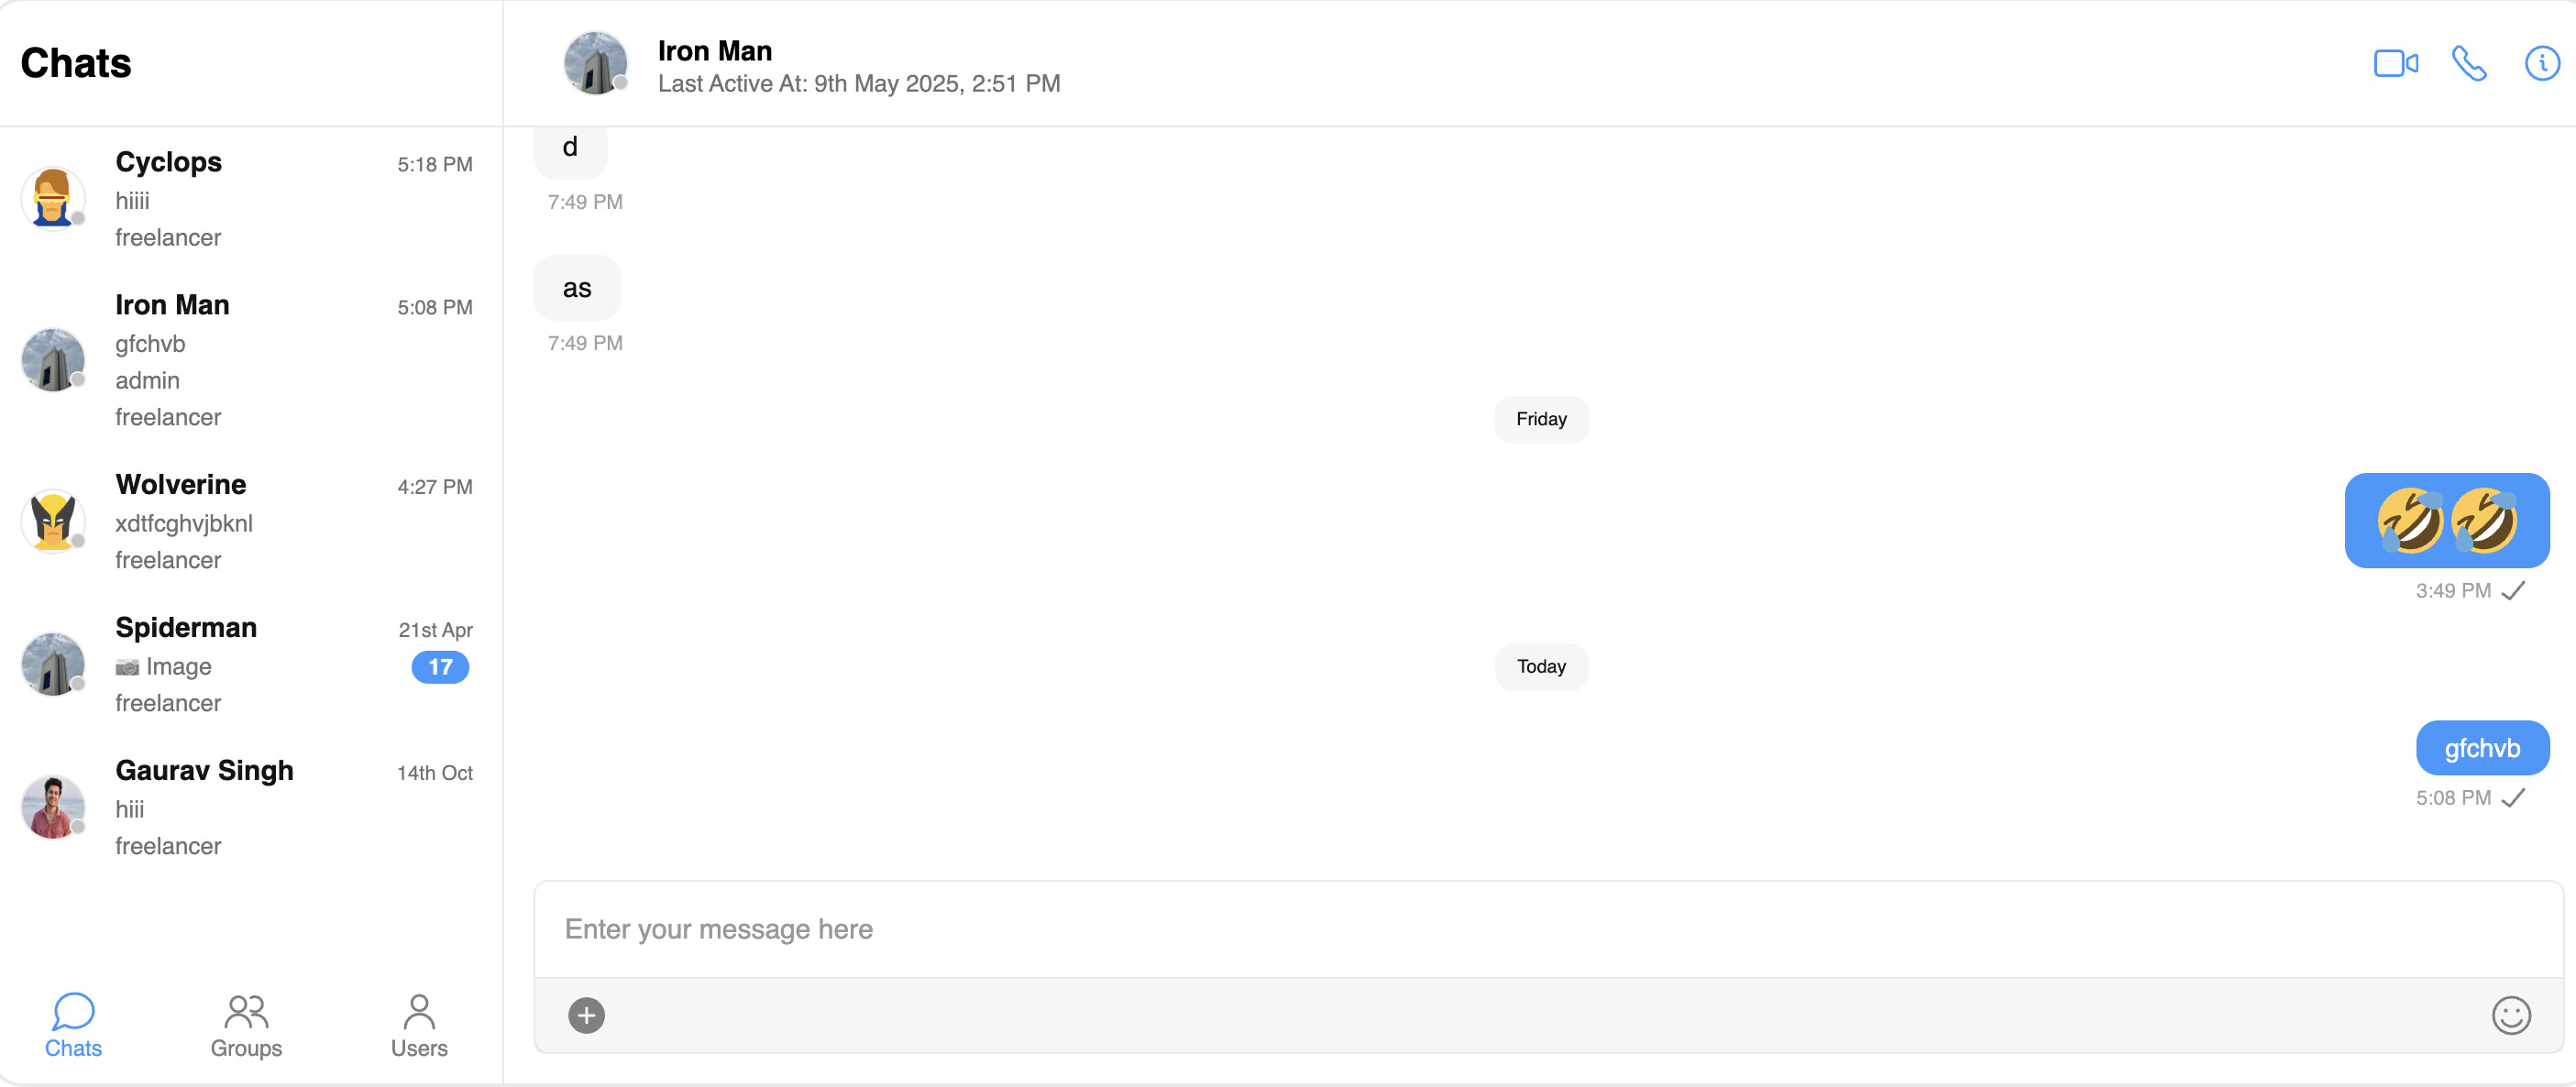
Note:
• The setTags() method is used to filter conversations based on the tags applied directly to conversations.
• The setUserTags() method filters conversations based on the tags present in the user object.
• The setGroupTags() method filters conversations based on the tags present in the group object.
Please note that setUserTags() and setGroupTags() cannot be used simultaneously. Only one of them should be applied at a time to avoid conflicts.
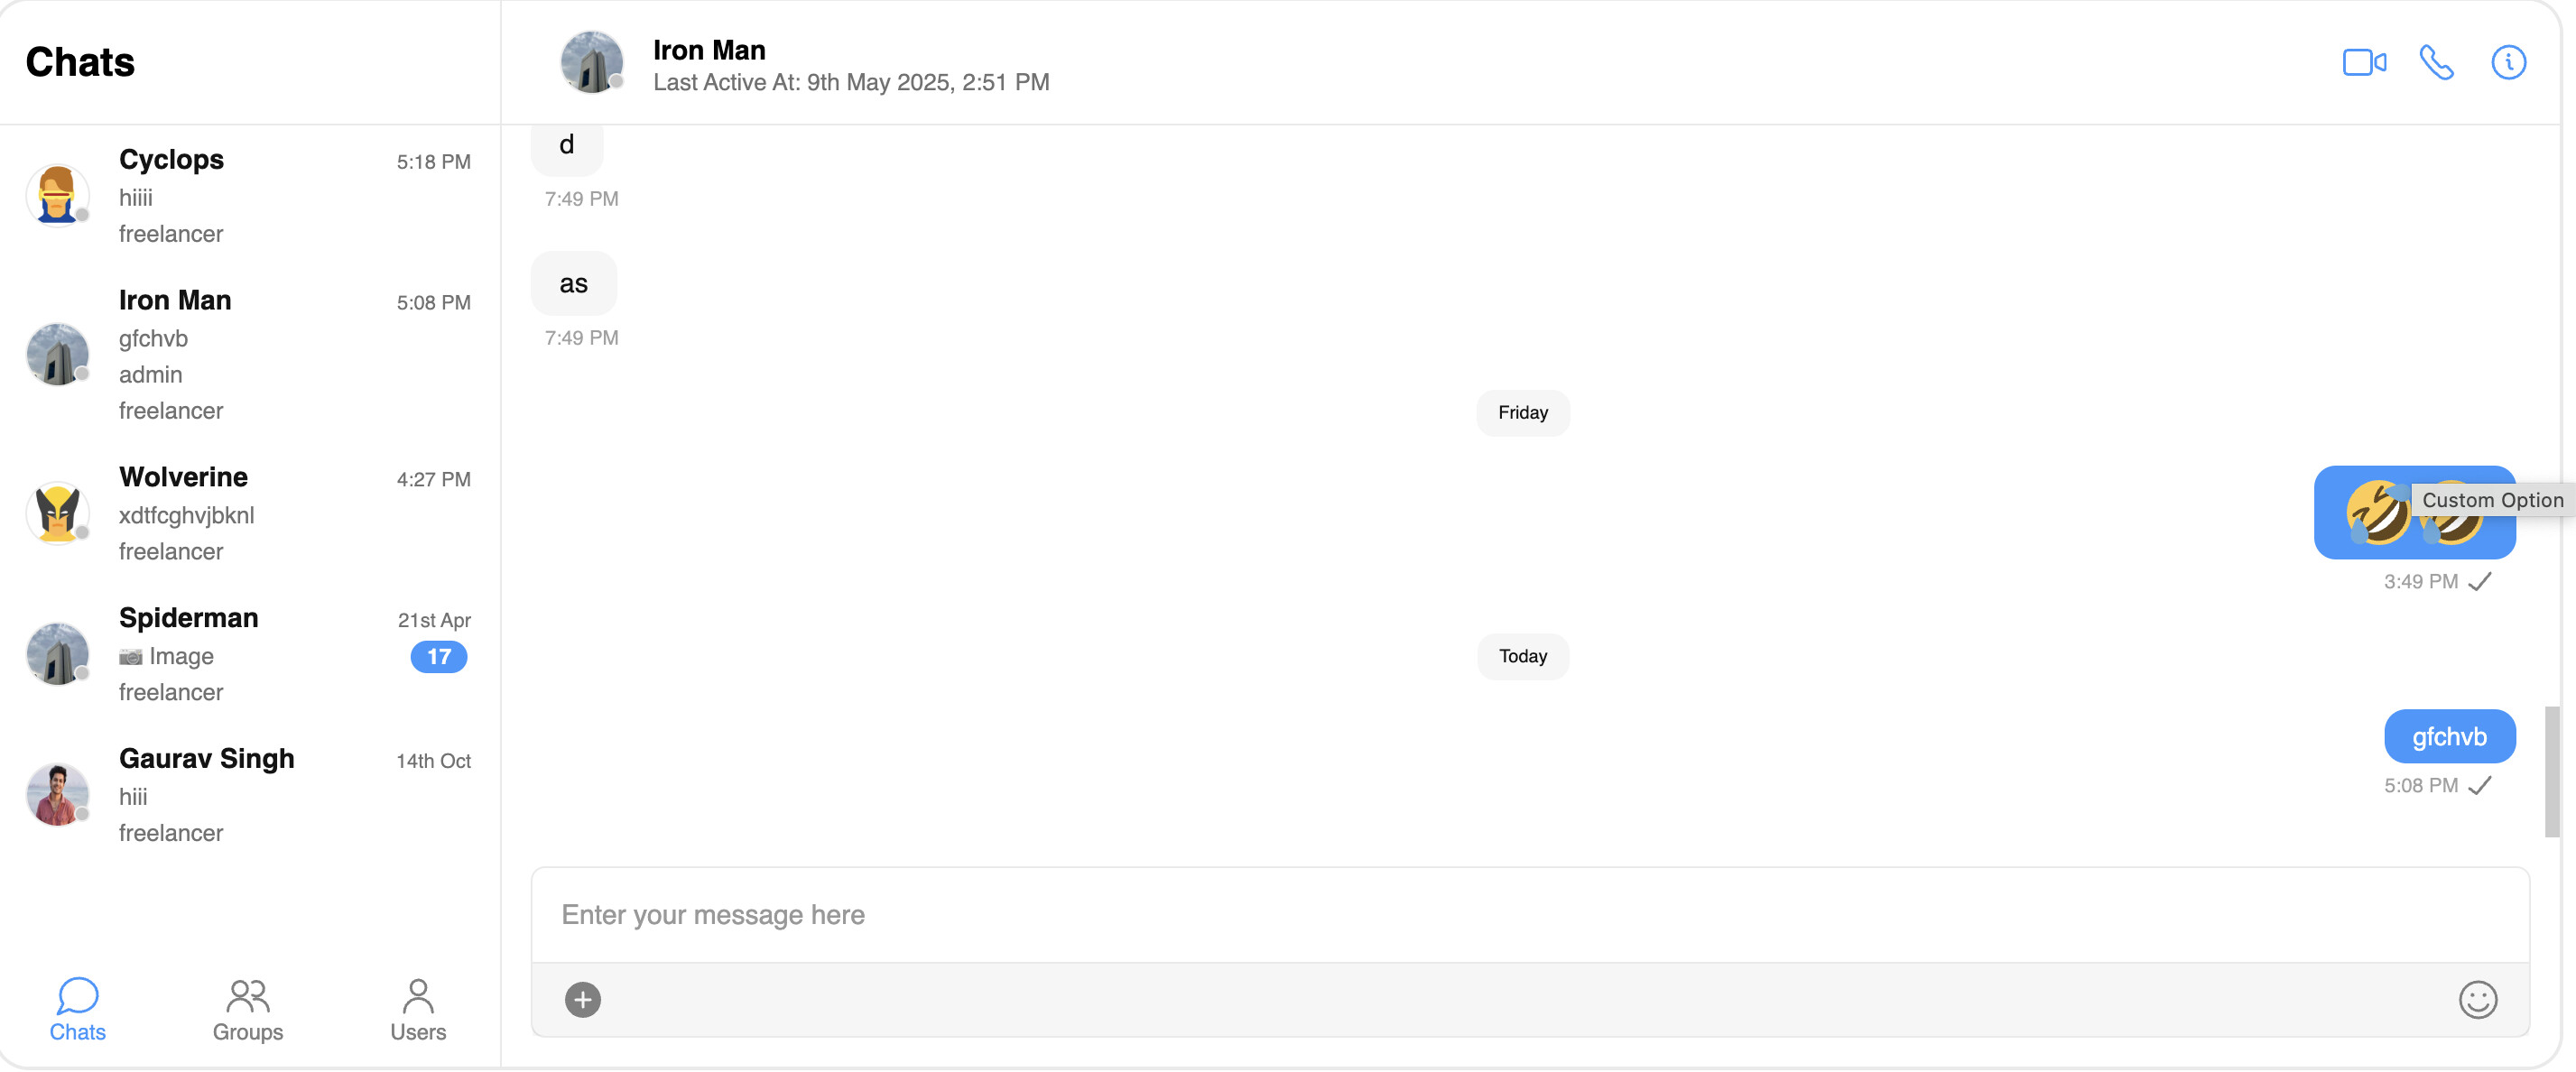
2. Adding custom message options (beside edit, copy etc.)
The last option which you see in the attached screenshot is the custom message option which we we have added using the following code:
// add the following code outside render()

// here you can handle click on option
promptAlert = () => {
	alert("Custom Option");
}
// add it inside the render() method just like other options messageInPrivate etc.
let customOption = null;
     customOption = (
	<li css={actionGroupStyle()} className='action__group'>
	  <button
		type='button'
		onMouseEnter={(event) => this.toggleTooltip(event, true)}
		onMouseLeave={(event) => this.toggleTooltip(event, false)}
		css={groupButtonStyle(location, this.context)}

					className='group__button button__location'
					data-title={Translator.translate(
						"CUSTOM_OPTION",
						this.context.language
					)}

					onClick={this.promptAlert}
				></button>
			</li>
		);
// in the tooltip render your custom option:
	let tooltip = (
			<ul
				css={messageActionStyle(
					this.props,
					this.context,
					this.state.loggedInUser
				)}
				className='message__actions'
			>
				{reactToMessage}
				{threadedChats}
				{editMessage}
				{deleteMessage}
				{messageInPrivate}
				{translateMessage}
				{customOption}
			</ul>
		);
To ensure that localization works correctly for labels—such as the ones displayed on hover (e.g., “Custom Option”) you need to define the appropriate keys in the localization files.
For example, add the following key-value pair to the English localization file:
“CUSTOM_OPTION”: “Custom Option”
![]() Path:
Path:
src/resources/localization/locales/en/translation.json
You can follow the same structure to add corresponding keys for other supported languages by editing their respective localization files. This ensures your custom labels are translated and displayed appropriately based on the selected language.
Once, you have made the necessary adjustments you can now proceed to create a build using the following command:
npm run build:custom
// This will generated a build folder under CometChatWorkspace/build path of your directory
Copy and paste all the files and folders from the build directory of the custom widget project into the build folder of your website or server.
![]() This server URL must match the one you specified in the CONSTS.ts file. It will act as the source for the Chat Widget script.
This server URL must match the one you specified in the CONSTS.ts file. It will act as the source for the Chat Widget script.
When using the default CometChat Widget, the script source typically looks like this:
<script type="text/javascript" src="https://widget-js.cometchat.io/v3/cometchatwidget.js"></script>
After uploading your custom build to your server (e.g., https://yourdomain.com), update the script source in your HTML accordingly:
<script type="text/javascript" src="https://yourdomain.com/build/cometchatwidget.js"></script>
For the default Chat Widget(Web) Users
<html>

<head>
  <script defer src="https://widget-js.cometchat.io/v3/cometchatwidget.js"></script>
</head>

<body>
  <div id="cometchat"></div>
  <script>
  window.addEventListener('DOMContentLoaded', (event) => {
  	CometChatWidget.init({
  		"appID": "APP_ID",
  		"appRegion": "APP_REGION",
  		"authKey": "AUTH_KEY"
  	}).then(response => {
  		console.log("Initialization completed successfully");
  		//You can now call login function.
  		CometChatWidget.login({
  			"uid": "UID"
  		}).then(response => {
  			CometChatWidget.launch({
  				"widgetID": "WIDGET_ID",
  				"target": "#cometchat",
  				"roundedCorners": "true",
  				"height": "600px",
  				"width": "800px",
  				"defaultID": 'cometchat-uid-1', //default UID (user) or GUID (group) to show,
  				"defaultType": 'user' //user or group
  			});
  		}, error => {
  			console.log("User login failed with error:", error);
  			//Check the reason for error and take appropriate action.
  		});
  	}, error => {
  		console.log("Initialization failed with error:", error);
  		//Check the reason for error and take appropriate action.
  	});
  });
  </script>
</body>

</html>
To use the custom one just replace the following script:
<head>
  <script defer src="https://widget-js.cometchat.io/v3/cometchatwidget.js"></script>
</head>
With:
<head>
  <script defer src="https://your_domain.com/cometchatwidget.js"></script>
</head>
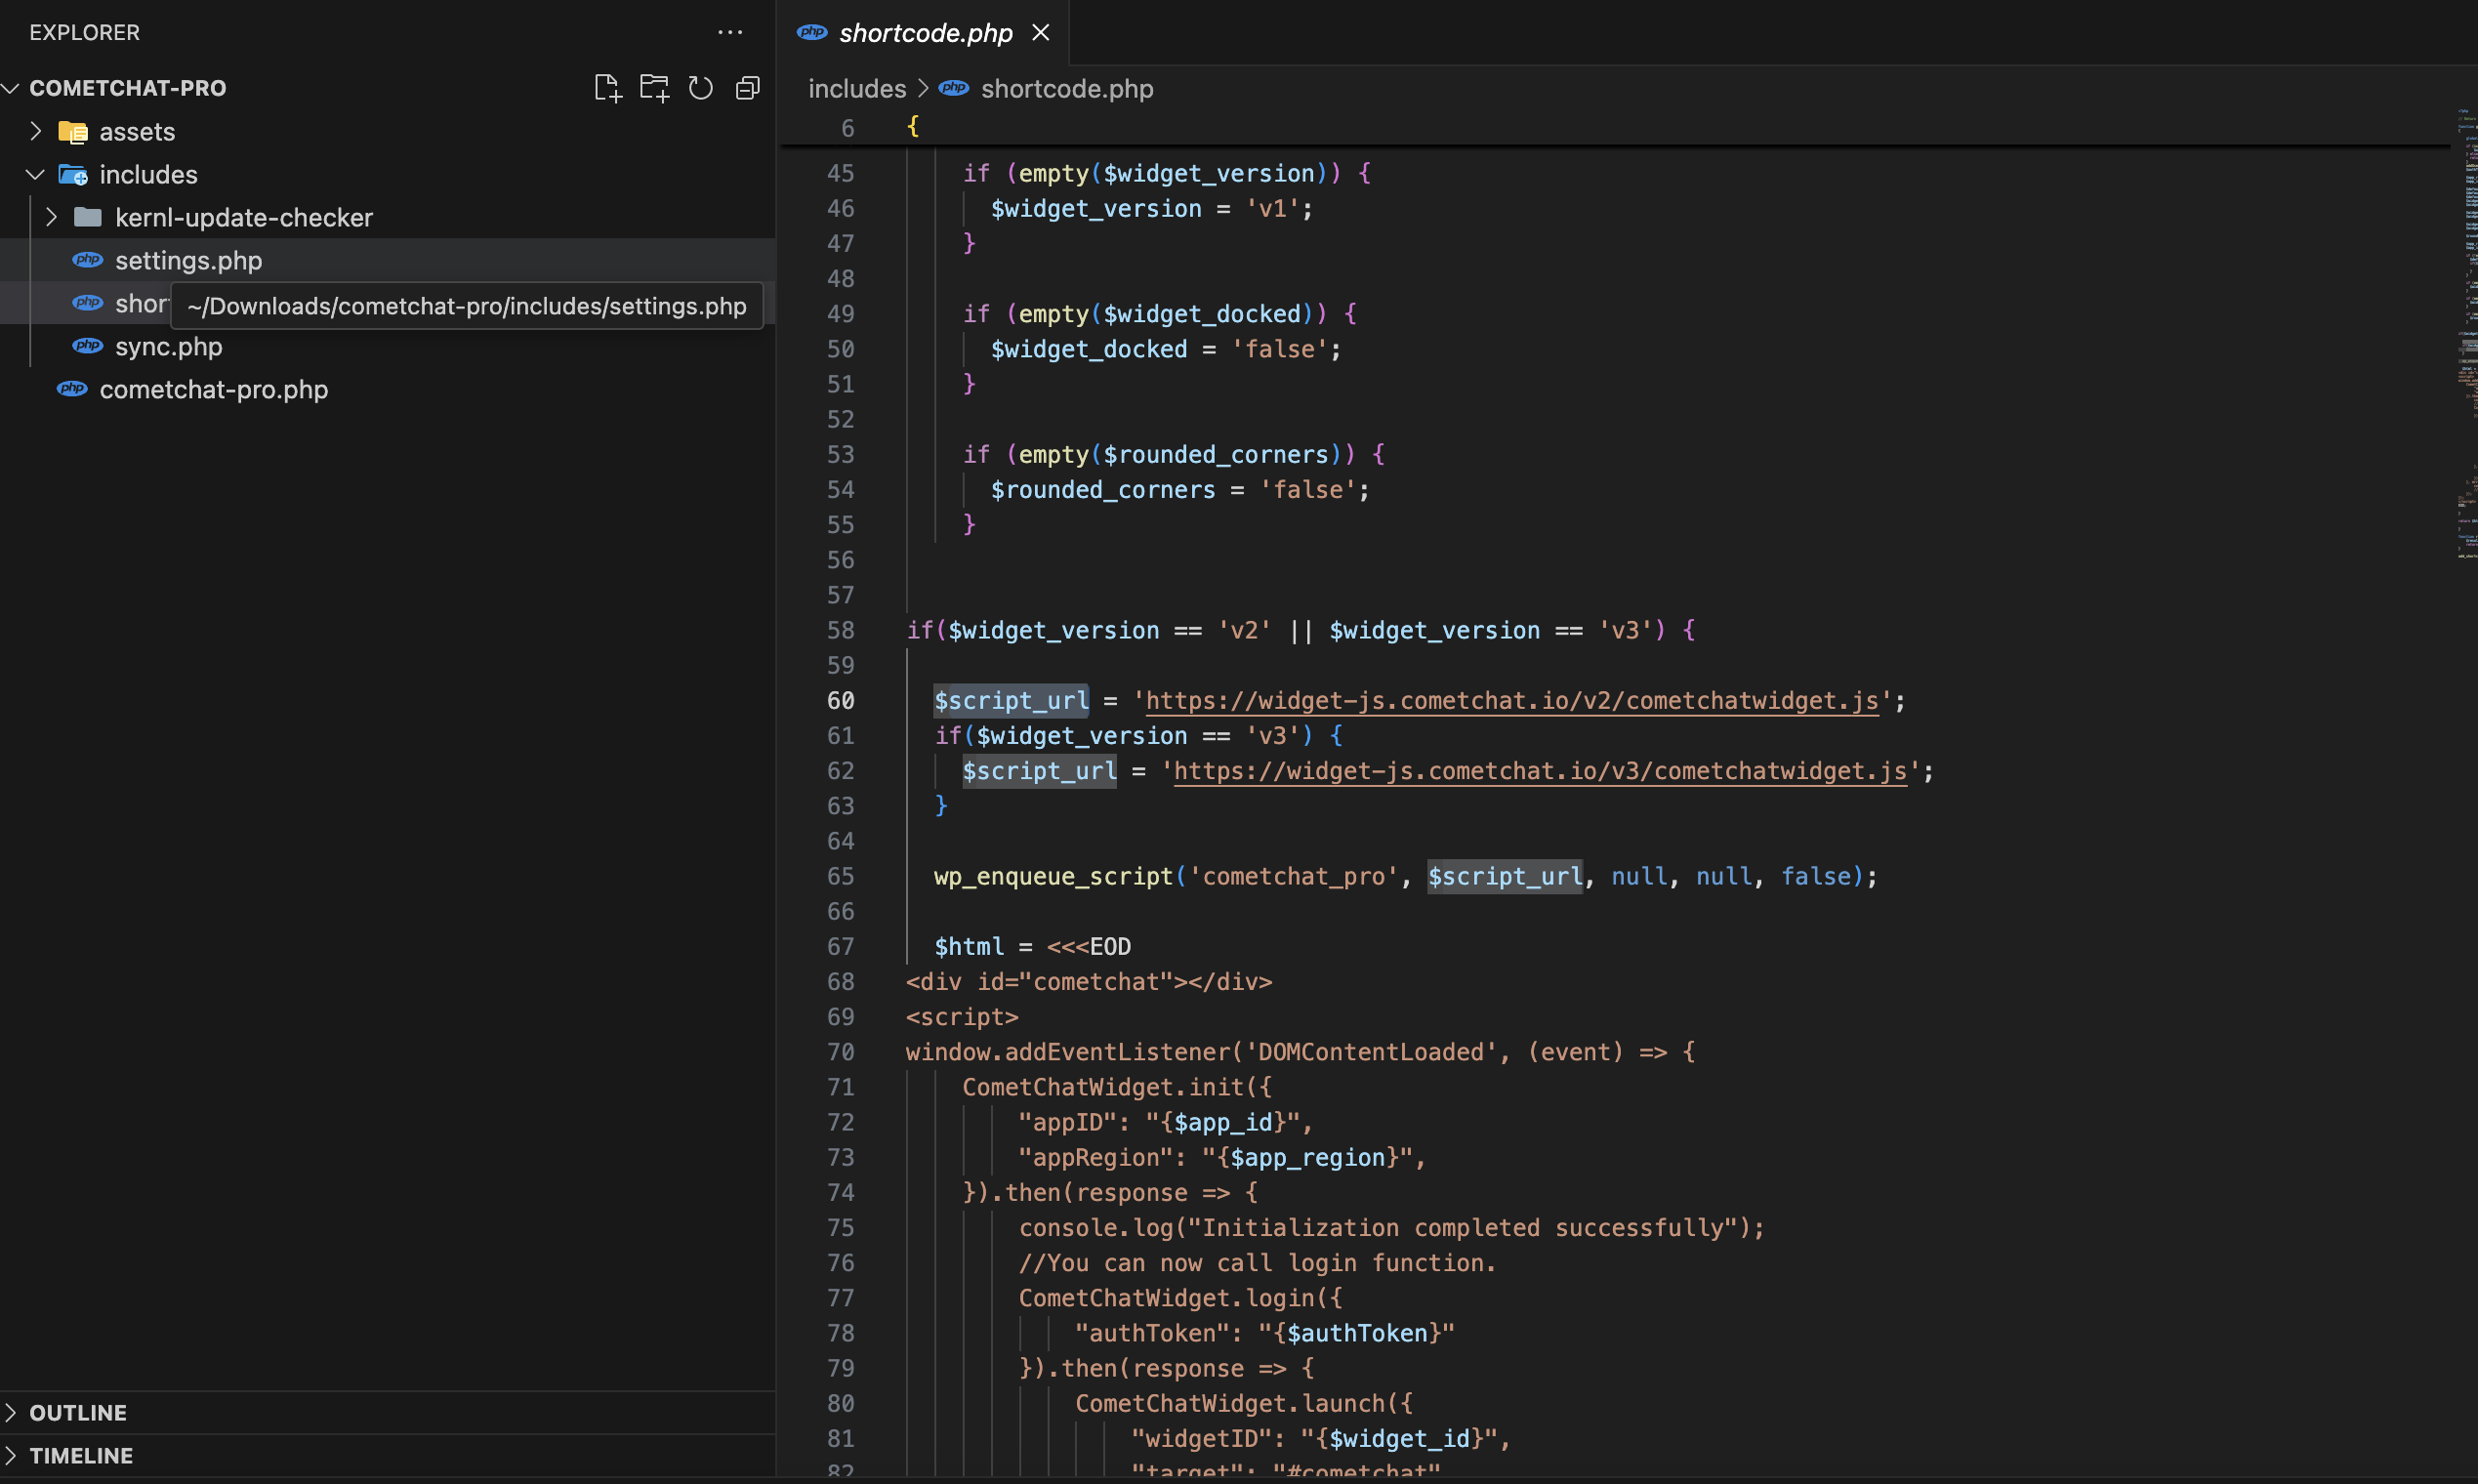
For WordPress Users:
If you’re using WordPress, the process to implement a custom CometChat Widget build is very similar to standard web integration. The key difference lies in how the script is updated.
- Download the CometChat Pro WordPress Plugin from our documentation.
- Unzip the downloaded plugin package.
- Navigate to the following file within the unzipped directory:
cometchat-pro/includes/shortcode.php - Search for the variable named $script_url.
- Replace the default CometChat script URL with the URL of your custom widget build. For example:
-
https://your_domain.com/cometchatwidget.js - Save the file, then re-zip the plugin folder and upload it to your WordPress site.
Note: This Chat Widget is open source, allowing you full flexibility to make any necessary modifications that align with your business requirements.
This guide has walked you through the steps to create, configure, and deploy a custom build of the widget.
Feel free to customize and maintain it independently as needed!