Guide Overview
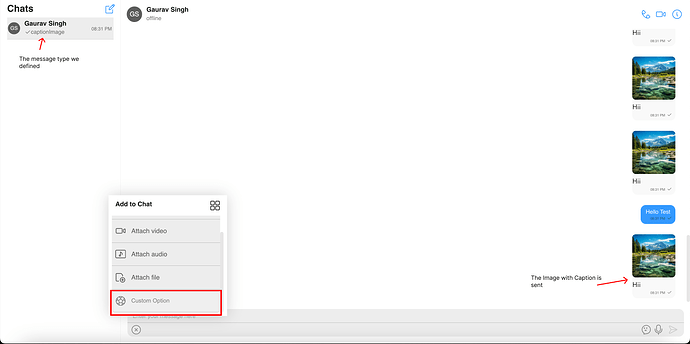
This guide explains how to add a new attachment option to the messageComposer, create a custom message template, and append it to the default message templates to display a custom UI for the new message type in Vue UI Kit.
For this guide, we will be using the Vue UI Kit. But this can be achieved using any of the CometChat UI Kits.
UIKit version:
"@cometchat/chat-uikit-vue": "^4.3.16",
This Guide can be used for adding new attachment option and sending custom messages
Steps for creating a custom message type Image with Caption -
1. Create a new attachment option to send this new type of message
Once the user is logged in, then get the default attachment options from the DataSource, and create a new option using CometChatMessageComposerAction class and push it into the default Attachment Options.
const getAttachmentOptions = (
      item: CometChat.User | CometChat.Group,
      composerId: any
    ) => {
      const customOption = new CometChatMessageComposerAction({
        id: "customOption",
        title: "Custom Option",
        iconURL: Icon,
        onClick: clickHandler,
        titleColor: "gray",
        iconTint: "gray",
      });
      const defaultAttachmentOption =
        CometChatUIKit.getDataSource().getAttachmentOptions(
          new CometChatTheme({}),
          composerId
        );
      defaultAttachmentOption.push(customOption);
      return defaultAttachmentOption;
    };
2. Create a function clickHandler to handle the onClick event of the custom attachment option just added in the previous step.
Create a custom message using the CustomMessage, you can set customData in the message, where we have added the URL of image and its caption.
    const clickHandler = () => {
      const receiverID = "receiver_ID";
      const customData = {
        image:
          "IMG_URL",
        text: "Caption text",
      };
      const customType = "captionImage";
      const receiverType = CometChat.RECEIVER_TYPE.USER;
      const customMessage = new CometChat.CustomMessage(
        receiverID,
        receiverType,
        customType,
        customData
      );
      // Use CometChatUIKit to send message so that message list updates in real-time
      CometChatUIKit.sendCustomMessage(customMessage);
    };
3. Create a new template and append it to the default Messages Template so that it can be rendered in the Message List.
  const getTemplates = () => {
      const definedTemplates =
        CometChatUIKit.getDataSource().getAllMessageTemplates(
         // passing theme is important as some time it may cause issue with polls or other message
          new CometChatTheme({})
        );
      const CUSTOM_MESSAGE_TYPE = "captionImage";
      const customMessageTemplate = new CometChatMessageTemplate({
        type: CUSTOM_MESSAGE_TYPE,
        category: "custom",
        contentView: (message: CometChat.BaseMessage) => getContentView(message),
        // To add default message options
        options: (loggedInUser, message, theme, group) => {
          return CometChatUIKit.getDataSource().getCommonOptions(
            loggedInUser,
            message,
            theme,
            group
          );
        },
      });
      definedTemplates.push(customMessageTemplate);
      return definedTemplates;
    };
4. Create the content view for the new message type -
Get the customData from the message object which we have set in step 2, use it to create the contentView,
    const getContentView = (message: any) => {
      const width = "100px";
      const height = "100px";
      const borderRadius = "8px";
      const imageUrl = message.getCustomData()
        ? message.getCustomData().image
        : "";
      const text = message.getCustomData()
        ? message.getCustomData().text
        : "No text";
      if (!message.getDeletedAt()) {
        return {
          html: `<img src="${imageUrl}" style="width: ${width}; height: ${height}; border-radius: ${borderRadius};"/><p>${ text }</p>`,
        };
      } else {
        return {
          html: `<div style="padding: 3px 10px; color: gray">Message is deleted</div>`,
        };
      }
    };
5. Now to get the default message categories and types we have used onMounted Lifecycle hook-
    onMounted(() => {
      CometChatUIKit.getLoggedinUser()?.then((user) => {
        if (user) {
          loggedinUser.value = user;
          // Only proceed after the user is set
          initializeDefaultValues();
        }
      });

      function initializeDefaultValues() {
        if (loggedinUser.value) {
          // Get default message types and categories and push the new type or category if it's not there
          let defaultTypesGot =
            CometChatUIKit.getDataSource().getAllMessageTypes();
          let defaultCategoryGot =
            CometChatUIKit.getDataSource().getAllMessageCategories();

          if (!defaultCategoryGot.includes("custom")) {
            defaultCategoryGot.push("custom");
          }

          if (!defaultTypesGot.includes("captionImage")) {
            defaultTypesGot.push("captionImage");
          }

          defaultTypes.value = defaultTypesGot;
          defaultCategory.value = defaultCategoryGot;
        }
      }
    });
6. Now, you simply need to pass the following messagesConfiguration in the CometChatConversationsWithMessages component.
  // setLimit is mandatory in requestBuilder but don't use .build() when using UIKIt as it's internally handled
    const messageListConfig = new MessageListConfiguration({
      templates: getTemplates(),
      messagesRequestBuilder: new CometChat.MessagesRequestBuilder()
        .setTypes(defaultTypes.value)
        .setCategories(defaultCategory.value)
        .hideReplies(true)
        .setLimit(30),
    });
    const messagesConfig = new MessagesConfiguration({
      messageListConfiguration: messageListConfig,
      messageComposerConfiguration: new MessageComposerConfiguration({
        attachmentOptions: (
          item: CometChat.User | CometChat.Group,
          composerId: ComposerId
        ) => getAttachmentOptions(item, composerId),
      }),
    });
7. Passing configuration to the component -
<template>
  <CometChatConversationsWithMessages
    :messagesConfiguration="messagesConfig"
  />
</template>
