How to Send Location in Chat
This documentation provides a step-by-step guide on adding the option to send a location in chat. This guide can be used as a reference for any of our V4 UI Kits.
Guide Details:
Language/Framework: React
SDK and UI Kit Versions:
"@cometchat/calls-sdk-javascript": "^4.0.6",
"@cometchat/chat-sdk-javascript": "^4.0.3",
"@cometchat/chat-uikit-react": "^4.1.1",
SDK Documentation: Web SDK
UI Kit Documentation: React UI Kit
Prerequisites
Familiarize yourself with the following CometChat classes:
- CometChatMessageTemplate
- CometChatMessageComposerAction
- MessagesConfiguration
- MessageComposerConfiguration
- MessageListConfiguration
- MessagesRequestBuilder
Introduction
CometChat allows you to send custom messages in your conversations, such as sharing your location. In this guide, we’ll add a new button to the Message Composer component that enables users to send their current location. We will be utilizing the React UI Kit for this implementation.
There are three main component properties we need to configure.
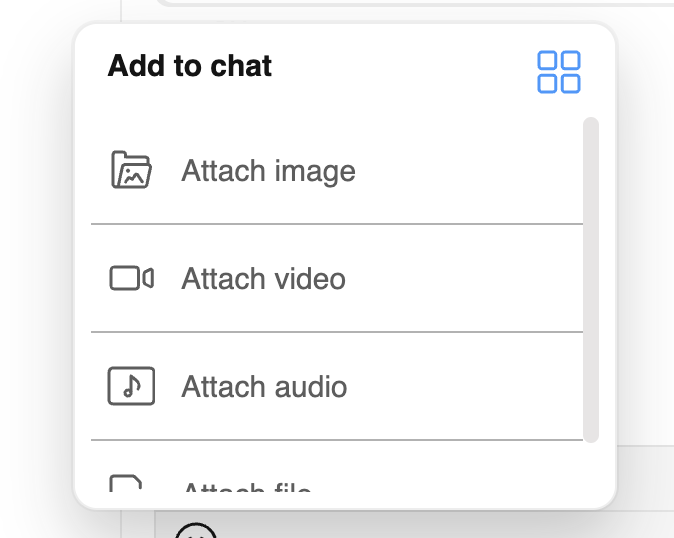
- Add the option to send location by creating a new CometChatMessageComposerAction and appending it to the list of default actions to include the ‘Send Location’ button.
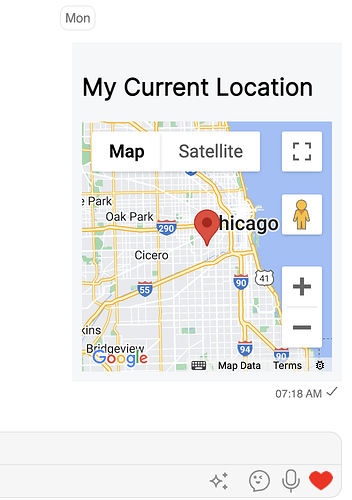
- Define the appearance of the location message by create a new
CometChatMessageTemplate and adding the template to the list of default templates to include our geolocation bubble and data. - Include the new message type and category in the data fetched by the API by creating a new MessagesRequestBuilder and setting the default categories and types list to include ‘location’.
Step by Step guide
Message Composer Action
By default we have a list of Message Composer Actions. These actions
are available via the Message Composer Configuration.
We will be creating a getNewAttachmentOptions() function to do the following:
-
Get all defaultAttachmentOptions.
-
Create a new CometChatMessageComposerAction with the following properties:
a. Set the title ‘Send Location’.
b. Set the iconURL and other styling properties.
c. onClick() function to get geolocation from the browser and send a custom message of type ‘location’.
-
Push the new CometChatMessageComposerAction to our list defaultAttachmentOptions.
Our function returns the new list defaultAttachmentOptions.
// Define a function to get new attachment options
function getNewAttachmentOptions(
  item: CometChat.User | CometChat.Group,
  composerId: any,
  theme: CometChatTheme
) {
  // Get all default attachment options from the UI kit
  const defaultAttachmentOptions: CometChatMessageComposerAction[] =
    CometChatUIKit.getDataSource().getAttachmentOptions(theme, composerId);

  // Create a new attachment option for sending location
  const newAttachmentOption = new CometChatMessageComposerAction({
    title: "Send Location", // Title of the new attachment option
    id: "location", // Identifier for the attachment option
    iconURL: LocationIcon, // URL of the icon for the attachment option
    iconTint: theme.palette.getAccent700(), // Color tint for the icon
    titleFont: fontHelper(theme.typography.subtitle1), // Font for the title
    titleColor: theme.palette.getAccent700(), // Color for the title
    borderRadius: "8px", // Border radius for styling
    background: theme.palette.getAccent100(), // Background color for styling

    onClick: async () => {
      // Function to execute when the send location option is clicked
      const geoData = {
        // Object to store geographical data
        latitude: 0,
        longitude: 0,
      };

      // Check if geolocation is available in the browser
      if ("geolocation" in navigator) {
        // Get the current position using geolocation
        const pos: any = await new Promise((resolve, reject) => {
          navigator.geolocation.getCurrentPosition(resolve, reject);
        });

        // Update latitude and longitude with the obtained coordinates
        geoData.latitude = pos.coords.latitude;
        geoData.longitude = pos.coords.longitude;
      } else {
        console.log("Geolocation is not available in your browser.");
      }

      // Determine whether the message is for a user or a group
      const receiverType = item instanceof CometChat.User ? "user" : "group";
      const receiverId =
        item instanceof CometChat.User ? item.getUid() : item.getGuid();

      // Define custom data for the message, including latitude and longitude
      const customData = {
        latitude: geoData.latitude,
        longitude: geoData.longitude,
      };

      // Create a custom message with the provided data
      const customMessage = new CometChat.CustomMessage(
        receiverId,
        receiverType,
        "location",
        customData
      );
      customMessage.setMetadata({ incrementUnreadCount: true }); // Set metadata for the message
      customMessage.setSentAt(CometChatUIKitUtility.getUnixTimestamp()); // Set the message sent timestamp
      customMessage.setMuid(CometChatUIKitUtility.ID()); // Set a unique ID for the message

      // Send the custom message using the UI kit
      await CometChatUIKit.sendCustomMessage(customMessage);
    },
  });

  // Add the new attachment option to the list of default options
  defaultAttachmentOptions.push(newAttachmentOption);

  // Return the updated list of attachment options
  return defaultAttachmentOptions;
}
Set up your Geolocation API
In this example, we will use the Google Maps API. The following code snippet demonstrates how to set up the required script:
const googleMapsLibraries: Libraries = ["places"];
const { isLoaded, loadError } = useLoadScript({
  googleMapsApiKey: "******API_KEY******",
  libraries: googleMapsLibraries,
});
Please note, it is not recommended to store any API key in the front-end. For the purpose of this guide, we are including the API key directly in the front-end application.
For enhanced security, it is crucial to restrict your Google Maps API keys. Ensure you apply HTTP referrer restrictions to limit the usage of the key to specific web pages or domains. Additionally, apply API restrictions to allow the key to be used only with necessary Google Maps APIs, such as the Maps JavaScript API, Geocoding API, and Places API. This helps prevent unauthorized use and potential abuse of your API key.
For more details, refer to Google’s API Security Best Practices.
Create the Message Template
We will create a getLocationTemplate() function to do the following:
- Create a new Message Template. This template sets the view for the location message.
- In our example, we use the GoogleMaps JS API, but any geolocation API can be used.
// Define a function to get the location message template
function getLocationTemplate() {
  // Create a new message template for custom location messages
  return new CometChatMessageTemplate({
    category: "custom",
    type: "location",
    // Define the content view for rendering the location message
    contentView: (message: CometChat.CustomMessage) => {
      // Style for the map container
      const mapContainerStyle = {
        width: "250px",
        height: "250px",
      };
      // Retrieve custom data from the message
      const customData: any = message.getCustomData();
      // Define center coordinates for the map
      const center = {
        lat: customData.latitude,
        lng: customData.longitude,
      };

      // Handle errors and loading states for Google Maps
      if (loadError) {
        return <div>Error loading maps</div>;
      }

      if (!isLoaded) {
        return <div>Loading maps</div>;
      }

      // Render the map with the provided center coordinates
      return (
        <div style={{ padding: "16px", backgroundColor: "#f6f7f8" }}>
          <h2>My Current Location</h2>
          <GoogleMap
            mapContainerStyle={mapContainerStyle}
            zoom={10}
            center={center}
          >
            <Marker position={center} />
          </GoogleMap>
        </div>
      );
    },
  });
}
Adding the template
We will create getNewTemplates() to do the following:
- Add the new location template to our list of defined templates.
// Retrieve all message templates available from the CometChat UI Kit data source
let definedTemplates = CometChatUIKit.getDataSource().getAllMessageTemplates();

// Function to add the location template at the beginning of the template list
function getNewTemplates() {
  definedTemplates.unshift(getLocationTemplate());
  return definedTemplates;
}
Message Request Builder
We will use getMessageRequestBuilder() to create a new MessagesRequestBuilder().
This property is available through the Message List Configuration.
- Define Message Categories and Types: Include all default categories and types, adding custom and location respectively.
- Build the Request: Create a new MessagesRequestBuilder and set the categories and types.
// Function to build a request for fetching messages
function getMessageRequestBuilder() {
  // Get all message categories from the CometChat UI Kit data source
  let categories = CometChatUIKit.getDataSource().getAllMessageCategories();
  // Add custom message category to categories list
  categories.push(CometChatUIKitConstants.MessageCategory.custom);

  // Get all message types from the CometChat UI Kit data source
  let types = CometChatUIKit.getDataSource().getAllMessageTypes();
  // Add "location" message type to types list
  types.push("location");

  // Build and return a new CometChat MessagesRequestBuilder instance
  // Set categories and types to filter messages
  // Hide replies to simplify message retrieval
  // Set limit to retrieve a maximum of 30 messages
  return new CometChat.MessagesRequestBuilder()
    .setCategories(categories)
    .setTypes(types)
    .hideReplies(true)
    .setLimit(30);
}
Modifying the UI Kit Component
Integrate the new properties into the CometChatConversationsWithMessages component:
// Function to render the CometChatConversationsWithMessages component
// Ensure the component is imported from the CometChat UI Kit
function GetConversationsWithMessages() {
  return (
    // Render the CometChatConversationsWithMessages component with provided props
    <CometChatConversationsWithMessages
      // Pass isMobileView prop to determine if the view is mobile
      isMobileView={isMobileView}
      // Configure messages using MessagesConfiguration
      messagesConfiguration={
        // Create a new MessagesConfiguration with custom options
        new MessagesConfiguration({
          // Configure message list using MessageListConfiguration
          messageListConfiguration: new MessageListConfiguration({
            // Define message templates for rendering messages
            templates: getNewTemplates(),
            // Define message request builder to fetch messages
            messagesRequestBuilder: getMessageRequestBuilder(),
          }),
          // Configure message composer with attachment options
          messageComposerConfiguration: new MessageComposerConfiguration({
            // Define attachment options for the message composer
            // Declare the parameters for our getNewAttachmentOptions() function
            attachmentOptions: (item, composerId) => {
              // Retrieve attachment options based on item and composerId
              return getNewAttachmentOptions(item, composerId);
            },
          }),
        })
      }
    />
  );
}

