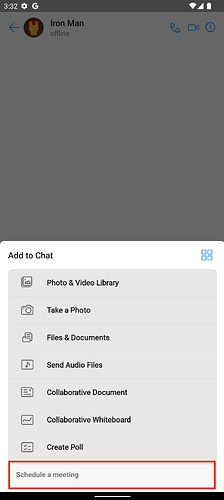
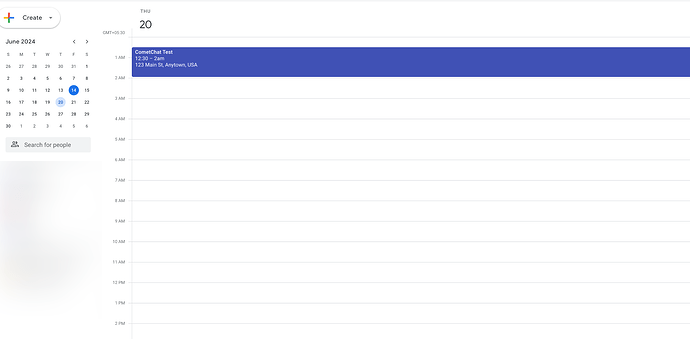
This guide explains how you can set up a seamless integration between Google Calendar and scheduler messages of the CometChat UI Kit.
For this guide, we will be using the Android UI Kit. But this can be achieved using any of the CometChat UI Kits
Environment
- CometChat Android Ui Kit
- Node JS
- MongoDB
Steps for the integration
1. Set up Google APIs
The first step in the integration is to create a Google Project and Enable the Google Calendar APIs for the project
To achieve this, please follow the below steps:
- Create a Project:
- Go to the Google Cloud Console.
- Log in to the console.
- Create a new project or select an existing one.
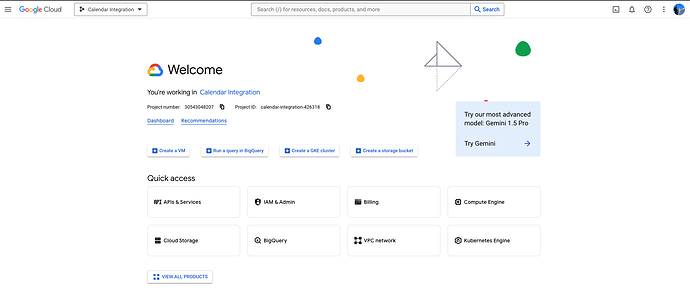
As you can see from the screenshot, we have created a project called Calendar Integration. We will be using this project for the course of this guide
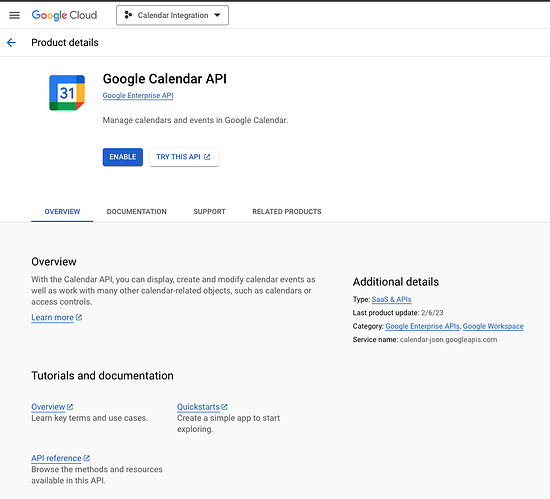
- Enable Google Calendar API:
- Navigate to
APIs & Services > Library. - Search for “Google Calendar API” and enable it.
- Set Up OAuth Consent Screen:
- Go to
APIs & Services > OAuth consent screen. - Configure the consent screen by filling in the required fields.
- Select the type of configuration
InternalorExternalbased on how you plan to test the APIs - Fill in the basic app information and click on
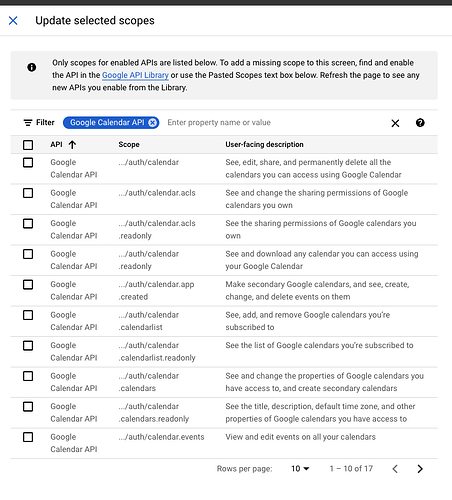
Save and Continue - Select the necessary scopes that you wish to use for the project. You can search for
Calendarand enable the required scopes
Please note: For the purpose of this guide, we will be needing the permissions to read/edit calendar events
In case you have select External configuration, You will need to share the emails of the users who will be testing this
- Set up the credentials:
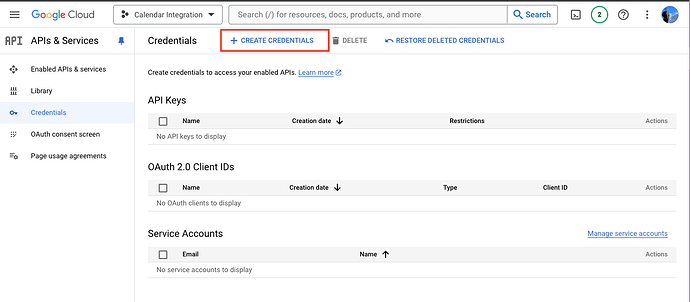
- Navigate to the credentials section in the Google Cloud Console
- Click on the
Create Credentialsoption to create fresh set of credentials
- Select
OAuth Client Idfrom the list of options - Select the Application type. For the purpose of this guide we will select Android.
- Fill in the details of your app and click
Create - Click on Click on the
Create Credentialsoption again. And selectWeb Application. - This second set of credentials are the ones that we are actually going to use in the Android client and on the server side
2. Google Integration in Android
Once the configuration on the Google Console is done, the next step is to set up the Google Sign In and Authorisation in the Android app.
- Add the necessary dependencies
- Please add the below dependency to the build.gradle file
implementation 'com.google.android.gms:play-services-auth:19.2.0'
-
Gather the Client Id from the Google Cloud Dashboard and save it to a Constants File in the Android Project
-
The Next step is to ask the user to allow permissions for our Google app to access the user’s calendar.
-
On successful login by the user into your app, you need to create an instance of the GoogleSignInClient class.This can be done as below
public static final String  CLIENT_ID = "YOUR_CLIENT_ID"; // Replace with your Google client Id
private GoogleSignInClient mGoogleSignInClient; // Declare Globally
private static final int RC_SIGN_IN = 123456; // Declare Globally

GoogleSignInOptions gso = new GoogleSignInOptions.Builder(GoogleSignInOptions.DEFAULT_SIGN_IN)
                        .requestScopes(new Scope("https://www.googleapis.com/auth/calendar"))
                        .requestEmail()
                        .requestServerAuthCode(CLIENT_ID, true)
                        .build();

mGoogleSignInClient = GoogleSignIn.getClient(this, gso);

Intent signInIntent = mGoogleSignInClient.getSignInIntent();
startActivityForResult(signInIntent, RC_SIGN_IN);
Please make sure to replace the CLIENT_ID with the CLIENT_ID from the web credentials created in the Google Cloud Dashboard
The above code will ask the user to Log In to their google account and also ask the user to allow our Google App created to access his/her calendar. Once the user allows/denies the permission, the onActivityResult() method is triggered with the necessary information.
 @Override
    protected void onActivityResult(int requestCode, int resultCode, @Nullable Intent data) {
        super.onActivityResult(requestCode, resultCode, data);
        if (requestCode == RC_SIGN_IN) {
            Task<GoogleSignInAccount> task = GoogleSignIn.getSignedInAccountFromIntent(data);
            handleSignInResult(task);
        }
    }

    private void handleSignInResult(@NonNull Task<GoogleSignInAccount> completedTask) {
        try {
            GoogleSignInAccount account = completedTask.getResult(ApiException.class);
            if (account != null) {
                String authCode = account.getServerAuthCode();
                String email = account.getEmail();
                Log.e(TAG, "Auth Code : " + authCode);
                registerCodeForUser(authCode, email);
            }
        } catch (ApiException e) {
            Log.w(TAG, "signInResult:failed code=" + e.getStatusCode());
        }
    }
Please note, the method registerCodeForUser() is the method that sends the code received to your server. To achieve this you will need to create an API on your end and send this code received to your server
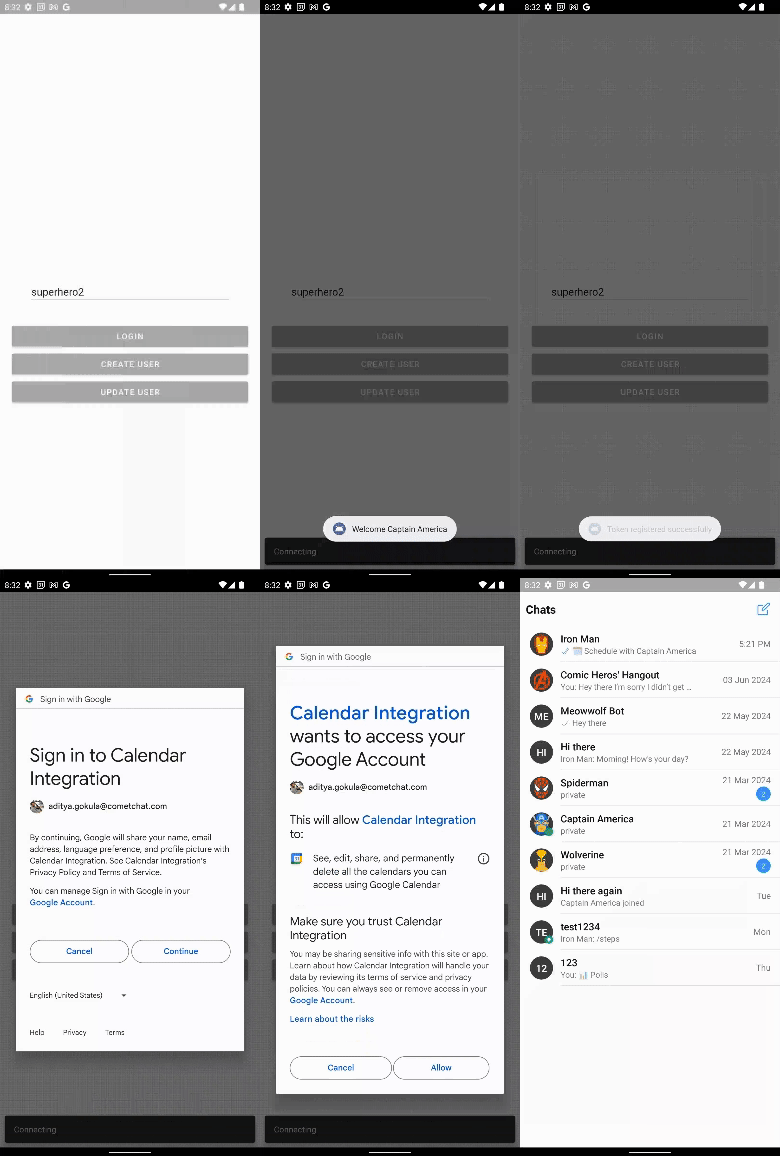
3. CometChat Android UI Kit Set up
The next step is to set up the CometChat UI Kit in your android project.
- Add the gradle dependencies
Open the project-levelsettings.gradlefile and add the following repository URL in therepositoriesblock under therepositoriessection.
dependencyResolutionManagement {
    repositoriesMode.set(RepositoriesMode.FAIL_ON_PROJECT_REPOS)
    repositories {
        google()
        mavenCentral()
        maven{
            url "https://dl.cloudsmith.io/public/cometchat/cometchat/maven/"
        }
    }
}
Open the app-level build.gradle file and add your package name as indicated in the code.
android {
    defaultConfig {
	...
	manifestPlaceholders = [file_provider: "YOUR_PACKAGE_NAME"] //add your application package.
    }
}
Open the app level build.gradle file and add the following dependency to fetch the chat UI kit into your project.
dependencies {
    implementation 'com.cometchat:chat-uikit-android:4.3.10'
}
Open the gradle.properties file and verify if the specified line is present. If not, add it accordingly.
android.enableJetifier=true
- Initialize CometChatUIkit
String appID = "APP_ID"; // Replace with your App ID
String region = "REGION"; // Replace with your App Region ("eu" or "us")
String authKey= "AUTH_KEY"; // Replace with your App ID

UIKitSettings uiKitSettings = new UIKitSettings.UIKitSettingsBuilder()
.setRegion(region)
.setAppId(appID)
.setAuthKey(authKey)
.subscribePresenceForAllUsers().build();

CometChatUIKit.init(this, uiKitSettings, new CometChat.CallbackListener<String>() {
@Override
public void onSuccess(String successString) {/_Your action after initializing cometchat_/}

    @Override
    public void onError(CometChatException e) {}

});
- Log in to the UI Kit
CometChatUIKit.login("superhero1", new CometChat.CallbackListener<User>() {
    @Override
    public void onSuccess(User user) {
       Log.d(TAG, "Login Successful : " + user.toString());
    }

    @Override
    public void onError(CometChatException e) {
        Log.e(TAG, "Login Failed : " + e.getMessage());
    }

});
For the purpose of the this guide we are going to use the CometChatConversationsWithMessages component.
- Create an Activity and a xml file for that activity. In the layout xml file add the below code.
<com.cometchat.chatuikit.conversationswithmessages.CometChatConversationsWithMessages
        android:id="@+id/conversation"
        android:layout_width="match_parent"
        android:layout_height="match_parent" />
- In the Activity file, please add the below snippet:
CometChatConversationsWithMessages conversationsWithMessages = (CometChatConversationsWithMessages) findViewById(R.id.conversation);
- Customising the UI Kit to add an option to schedule meetings
- To achieve this, we will add a button to the AttachOptions available named
Schedule Meeting
MessagesConfiguration messagesConfiguration = new MessagesConfiguration();
            MessageComposerConfiguration messageComposerConfiguration = new MessageComposerConfiguration();
            messageComposerConfiguration.setAttachmentOption(new Function4<Context, User, Group, HashMap<String, String>, List<CometChatMessageComposerAction>>() {
                @Override
                public List<CometChatMessageComposerAction> invoke(Context context, User user, Group group, HashMap<String, String> stringStringHashMap) {
                    final CometChatMessageComposerAction schedulerAction = new CometChatMessageComposerAction();
                    schedulerAction.setId("id_scheduler");
                    schedulerAction.setTitle("Schedule a meeting");
                    schedulerAction.setOnClick(new OnClick() {
                        @Override
                        public void onClick() {
                            requestSchedule(CometChat.getLoggedInUser().getUid(), user.getUid());

                        }
                    });
                    List<CometChatMessageComposerAction> messageComposerActionList = CometChatUIKit.getDataSource().getAttachmentOptions(UIKitActivity.this,user,group,stringStringHashMap);
                    messageComposerActionList.add(schedulerAction);
                    return messageComposerActionList;
                }
            });
            messagesConfiguration.setMessageComposerConfiguration(messageComposerConfiguration);
            conversationsWithMessages.setMessagesConfiguration(messagesConfiguration);
4. NodeJS and Database Set up
For the purpose of this guide, we will be using the below dependencies. Please add the below to your package.json file and run the npm install command
"axios": "^1.6.3",
"body-parser": "^1.20.2",
"express": "^4.18.2",
"form-data": "^4.0.0",
"googleapis": "^137.1.0",
"ics": "^3.7.2",
-
- In the index.js, please add the below routes:
app.post("/users/:uid/code", GCalController.generateAccesstoken)

app.get("/users/:uid/schedule", GCalController.requestSchedule)

app.get("/users/:uid/calendar/basic.ics", GCalController.getICSData)

app.post("/users/:uid/calendar/events", GCalController.createEvent)
1. POST /users/:uid/code
- This endpoint is set up to take the code received in Android app after successfully gaining access to the users calendar, and generating the necessary tokens for that user.
2. GET /users/:uid/schedule
- This endpoint, generates as scheduler message and sends it to the conversation on behalf of the receiver of the scheduling request.
For example:
User A navigates to the chat window of User B and clicks on the Schedule Meeting option.
The above API will be triggered, and it will send a scheduler message with the availability of User B into the conversation on Behalf of User B.
3. GET /users/:uid/calendar/basic.ics
- This endpoint is responsible to fetch the ics file with the events for the users calendar so that the scheduler message can display the time-slots as per the users availability
4. POST /users/:uid/calendar/events
- This endpoint is responsible adding the event to the users calendar and set up the meeting
5. Linking the Android app and the APIs
-
- As soon as the user authorises the app using the OAuth Consent Screen in the Android app, a code is generated for the user. This code needs to be sent to your server.
In our case, we will be using the POST request on/users/:uid/code, and share the code in the body of the request.
- As soon as the user authorises the app using the OAuth Consent Screen in the Android app, a code is generated for the user. This code needs to be sent to your server.
-
- Once this code is received on the server, we will generate and
access_tokenand arefresh_tokenfor the user and save it against the user in the database.
- Once this code is received on the server, we will generate and
-
- For the same, we will be using the
googleapispackage and the code for the same is as below
- For the same, we will be using the
const { google } = require('googleapis');

const oauth2Client = new google.auth.OAuth2(
    "YOUR_CLIENT_ID",
    "YOUR_CLIENT_SECRET"
);

exports.generateAccesstoken = async (req, res) => {
  try {
    const { uid } = req.params;
    const { code, email, user } = req.body;

    const { tokens } = await oauth2Client.getToken(code);
    oauth2Client.setCredentials(tokens);

    const query = { uid };
    const update = {
      $set: {
        access_token: tokens.access_token,
        refresh_token: tokens.refresh_token,
        email,
        user
      }
    };
    const options = { upsert: true };

    await db.get().collection('gcal_users').updateOne(query, update, options);

    res.status(200).json("Success");
  } catch (error) {
    console.error(error);
    res.status(500).json("Internal Server Error");
  }
};
- In the Android App, when the user A clicks on the
Schedule Meetingoption with User B, we trigger the /GET request on/users/:uid/schedule.
This API will generate a CometChat Scheduler message and send it into the conversation on behalf of User 2.
The code snippet for the same is as follows:
const axios = require('axios');
const constants = require('./constants'); // Assuming constants is imported from another file

exports.requestSchedule = async (req, res) => {
  const { uid } = req.params;
  const { requester: requesterUID } = req.body;

  try {
    const requestedFor = await db.get().collection('gcal_users').findOne({ uid });
    const requester = await db.get().collection('gcal_users').findOne({ uid: requesterUID });

    if (!requestedFor || !requester) {
      return res.status(404).json("User not found");
    }

    await sendSchedulerMessage(requestedFor, requester);
    res.status(200).json("Success");
  } catch (error) {
    console.error(error);
    res.status(500).json("Internal Server Error");
  }
};

async function sendSchedulerMessage(requestedFor, requester) {
  const data = JSON.stringify({
    receiver: requester.uid,
    receiverType: "user",
    category: "interactive",
    type: "scheduler",
    data: {
      receiverType: "user",
      receiver: requester.uid,
      muid: "16Jan3:41423PM",
      interactionGoal: { type: "anyAction" },
      allowSenderInteraction: false,
      interactiveData: {
        title: `Schedule with ${requestedFor.name}`,
        avatarUrl: requestedFor.avatar,
        bufferTime: 15,
        icsFileUrl: `http://adityagokula.com/users/${requestedFor.uid}/calendar/basic.ics`,
        availability: {
          friday: [{ to: "2100", from: "1159" }],
          monday: [{ to: "2100", from: "1159" }],
          tuesday: [{ to: "2100", from: "1159" }, { to: "2100", from: "1159" }],
          thursday: [{ to: "2100", from: "1159" }],
          wednesday: [{ to: "2100", from: "1159" }]
        },
        timezoneCode: "Asia/Kolkata",
        duration: 30,
        scheduleElement: {
          action: {
            url: `http://adityagokula.com/users/${requestedFor.uid}/calendar/events`,
            actionType: "apiAction",
            method: "POST",
            headers: {
              accept: "application/json",
              "content-type": "application/json"
            },
            payload: { requester: requester.uid }
          },
          elementId: "1",
          buttonText: "Schedule",
          elementType: "button",
          disableAfterInteracted: true
        },
        goalCompletionText: "Your meeting has been Scheduled",
        dateRangeStart: "2024-06-13",
        dateRangeEnd: "2024-06-25"
      }
    }
  });

  const config = {
    method: 'post',
    maxBodyLength: Infinity,
    url: `https://${constants.SCHEDULER_APP_ID}.api-${constants.SCHEDULER_REGION}.cometchat.io/v3.0/messages`,
    headers: {
      apiKey: constants.SCHEDULER_API_KEY,
      onBehalfOf: requestedFor.uid,
      "Content-Type": "application/json",
      Accept: "application/json"
    },
    data
  };

  try {
    const response = await axios.request(config);
    console.log(JSON.stringify(response.data));
  } catch (error) {
    console.error(error);
  }
}
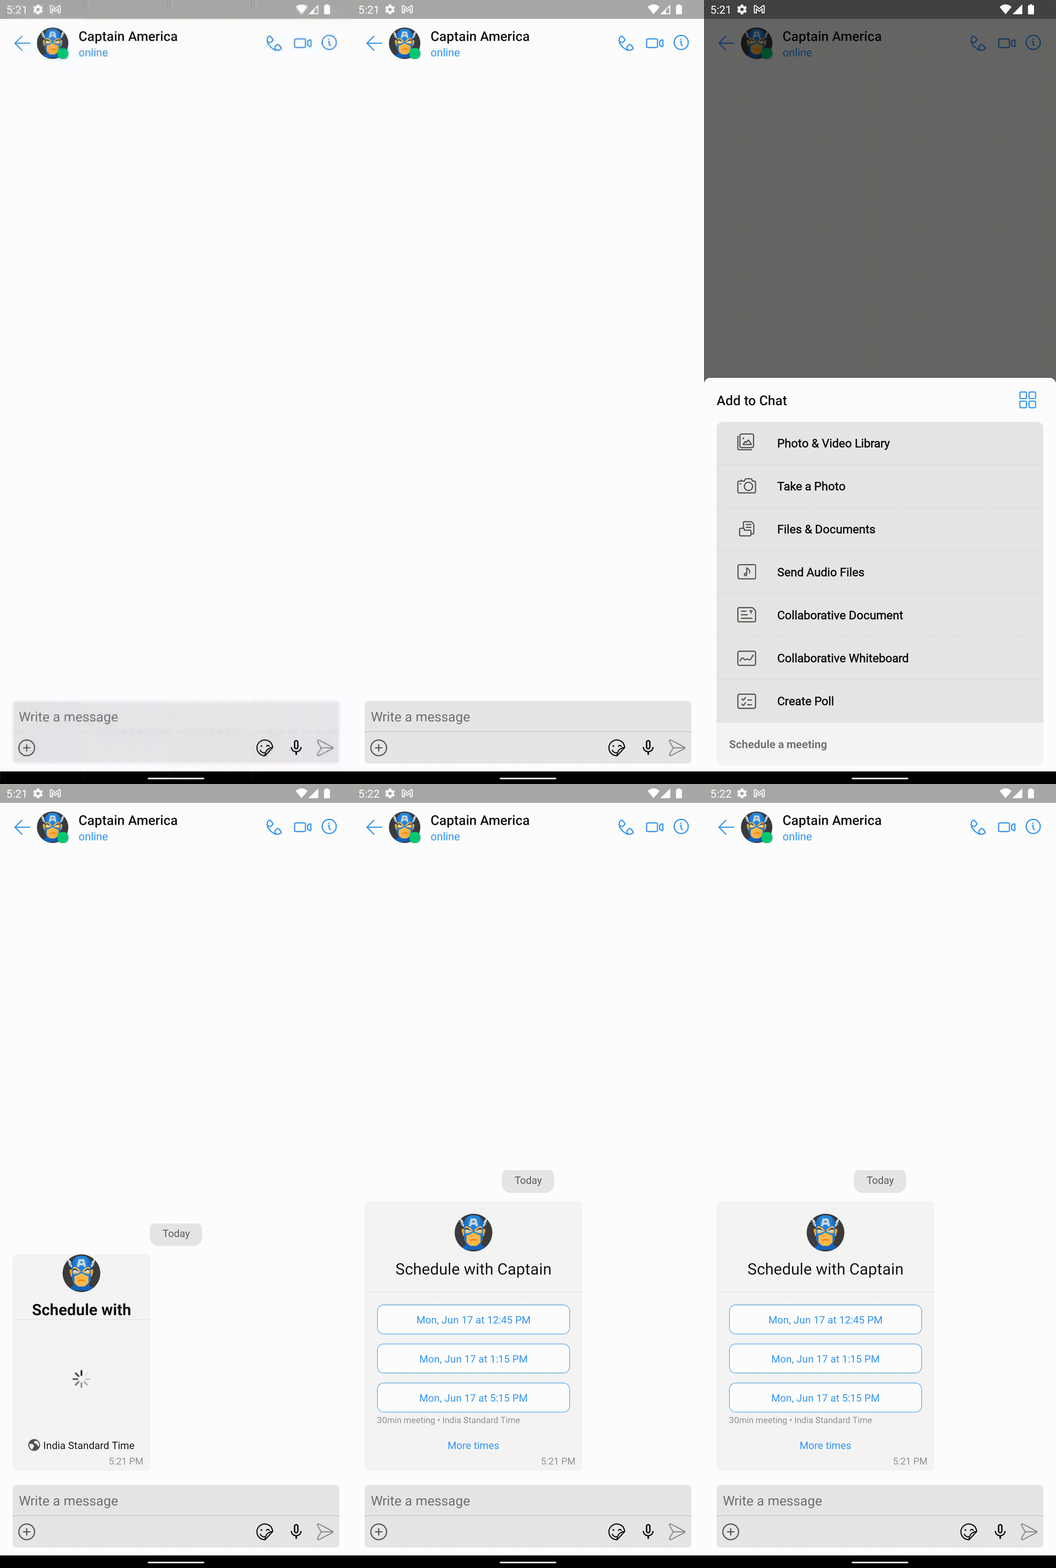
- The scheduler message payload, includes the link to access the calendar events of the User B in the ics format. The URL is the API mentioned where we set up a GET request on the
/users/:uid/calendar/basic.ics.
This API uses the googleapis and the ics package to list the calendar events and convert the same to ics format.
The code for the same is as follows:
const { google } = require('googleapis');
const { createEvents } = require('ics');
const oauth2Client = new google.auth.OAuth2();

exports.getICSData = async (req, res) => {
  const { uid } = req.params;

  try {
    // Fetch user from database
    const user = await db.get().collection('gcal_users').findOne({ uid });

    // Handle user not found
    if (!user) {
      return res.status(404).json({ error: 'User not found' });
    }

    // Set OAuth2 credentials
    oauth2Client.setCredentials({
      access_token: user.access_token,
      refresh_token: user.refresh_token,
    });

    // List events from Google Calendar
    const eventsJSON = await listEvents(oauth2Client);

    // Map events to ICS format
    const events = eventsJSON.map(event => ({
      title: event.summary || '',
      description: event.description || '',
      location: event.location || '',
      start: dateArray(event.start.dateTime),
      end: dateArray(event.end.dateTime),
    }));

    // Create ICS file
    createEvents(events, (error, value) => {
      if (error) {
        console.error(error);
        return res.status(500).json({ error: 'Failed to create events' });
      }
      res.status(200).json(value);
    });
  } catch (error) {
    console.error(error);
    res.status(500).json({ error: 'Internal Server Error' });
  }
};

// Helper function to list events
async function listEvents(auth) {
  const calendar = google.calendar({ version: 'v3', auth });
  const res = await calendar.events.list({
    calendarId: 'primary',
    timeMin: new Date().toISOString(),
    maxResults: 10,
    singleEvents: true,
    orderBy: 'startTime',
  });
  return res.data.items;
}

// Helper function to convert dateTime to date array
function dateArray(dateTime) {
  const date = new Date(dateTime);
  return [
    date.getFullYear(),
    date.getMonth() + 1,
    date.getDate(),
    date.getHours(),
    date.getMinutes(),
    date.getSeconds()
  ];
}
This API returns the ics content for the user’s calendar events. this is used by the CometChat UI Kit along with the availability set in the Schedule Message payload. For more information on the on the parameters of the Interactive Messages payload, You can check out our documentation
- The Scheduler Message payload also lets you set up the API to be triggered when the Schedule button is clicked on the front-end. We have set the button to trigger the POST request on the
/users/:uid/calendar/events.
This API takes the information of the interaction on the scheduler bubble and updates the User B’s calendar with the meeting information.
You can find the code snippet for the same below:
async function updateCalendar(requestedFor, requester, startTime, duration) {
    const calendar = google.calendar({ version: 'v3', auth: oauth2Client });

    const event = {
        summary: 'CometChat Test',
        location: '123 Main St, Anytown, USA',
        description: 'This is a sample event created via Google Calendar API',
        start: {
            dateTime: startTime, // Adjust as needed
            timeZone: 'Asia/Kolkata',        // Adjust as needed
        },
        end: {
            dateTime: new Date(new Date(startTime).getTime() + duration * 60 * 1000),
            timeZone: 'Asia/Kolkata',        // Adjust as needed
        },
        attendees: [
            { email: requestedFor.email },
            { email: requester.email }
        ],
        reminders: {
            useDefault: false,
            overrides: [
                { method: 'email', minutes: 24 * 60 }, // 24 hours before event
                { method: 'popup', minutes: 10 }       // 10 minutes before event
            ]
        }
    };

    try {
        const response = await calendar.events.insert({
            calendarId: 'primary',
            resource: event
        });

        console.log('Event created:', response.data);
    } catch (error) {
        console.error('Error creating event:', error);
        throw error; // Propagate error to caller for better error handling
    }
}
This will schedule the meeting and add the events to the calendars of both the users.
