1. Setting Up Firebase
-
Install Firebase CLI
-
Run the following command:
curl -sL https://firebase.tools | bash
-
-
Login to Firebase
-
Log in using your Google account:
firebase login
- Install FlutterFire CLI
- Execute this command:
dart pub global activate flutterfire_cli
- Configure Firebase in Your Flutter Project
- Use FlutterFire CLI to link Firebase to your Flutter project:
flutterfire configure
2. Setting Up Dependencies
Add the flutter_apnx_x and flutter_apns_only dependencies to the root level of the project.
flutter_apns_x Dependency - flutter_apns_x - Google Drive
flutter_apns_only Dependency - flutter_apns_only - Google Drive
Please adjust the imports in the dart files accordingly.
Add the following dependencies in your pubspec.yaml file:
dependencies:
    flutter_callkit_incoming: ^2.0.4+2
    cometchat_chat_uikit: ^4.5.10
    cometchat_calls_uikit: ^4.3.4
    firebase_core: ^3.8.1
    firebase_messaging: ^15.1.6
    shared_preferences: ^2.3.3
    flutter_apns_only:
      path: ./flutter_apns_only
    flutter_apns_x:
      path: ./flutter_apns_x
    permission_handler: ^10.0.0
3. Define App Constants
In app_constants.dart, create a class to store constants:
class AppConstants {
  static const String region = "<your-region>";
  static const String appId = "<your-app-id>";
  static const String authKey = "<your-auth-key>";
  static const String loginUser = "<your-login-user-id>";
  static const String fcmProviderId = "<your-fcm-provider-id>";
  static const String apnsProviderId = "<your-apns-provider-id>";
}
4. Implement Shared Preferences for Storing User Data
Create shared_preferences.dart to handle persistent storage:
5. Create Notification Payload Classes
Define payload_data.dart for structured handling of notification payloads:
6. Define Call Types and Actions
Create call_type.dart and call_action.dart to specify VoIP call types and actions.
Example call_type.dart:
Example call_action.dart:
7. Setting up Firebase Service for Android Notifications
If the app is in ANDROID device firebase_service.dart is called and initialized. In this file firebase token is generated, delete token, initialize listeners, code for opening call notifications, handling notifications in background and killed state.
8. Setting Up APNS for iOS Push Notifications
Implement apns_service.dart to handle incoming calls on iOS. If the app is in iOS device apns_service.dart is called and initialized. In this file apns and voip tokens are generated, initialize listeners, code for opening call notifications, handling notifications in background and killed state (The below code is responsible for handling the notifications).
9. Login And Token Registration:
After successfully login, we need to initialize firebase and apns in the home screen -
final FirebaseService notificationService = FirebaseService();
final APNSService apnsServices = APNSService();
and in the initState() -
void initState() {
  WidgetsBinding.instance.addObserver(this);
  super.initState();
  if (Platform.isAndroid) {
  widget.notificationService.init(context);
  } else {
    widget.apnsServices.init(context);
  }
}
On Successful Logout:
CometChatNotifications.unregisterPushToken(onSuccess: (response) {
    debugPrint("unregisterPushToken:success ${response.toString()}");
}, onError: (e) {
    debugPrint("unregisterPushToken:error ${e.toString()}");
});
await CometChatUIKit.logout();
10. Configuring the App Entry Point
Update main.dart to initialize necessary services and define the entry screen.
11. AppDelegate Setup for iOS VoIP Notifications
For iOS, configure AppDelegate.swift to handle VoIP notifications and integrate CallKit.
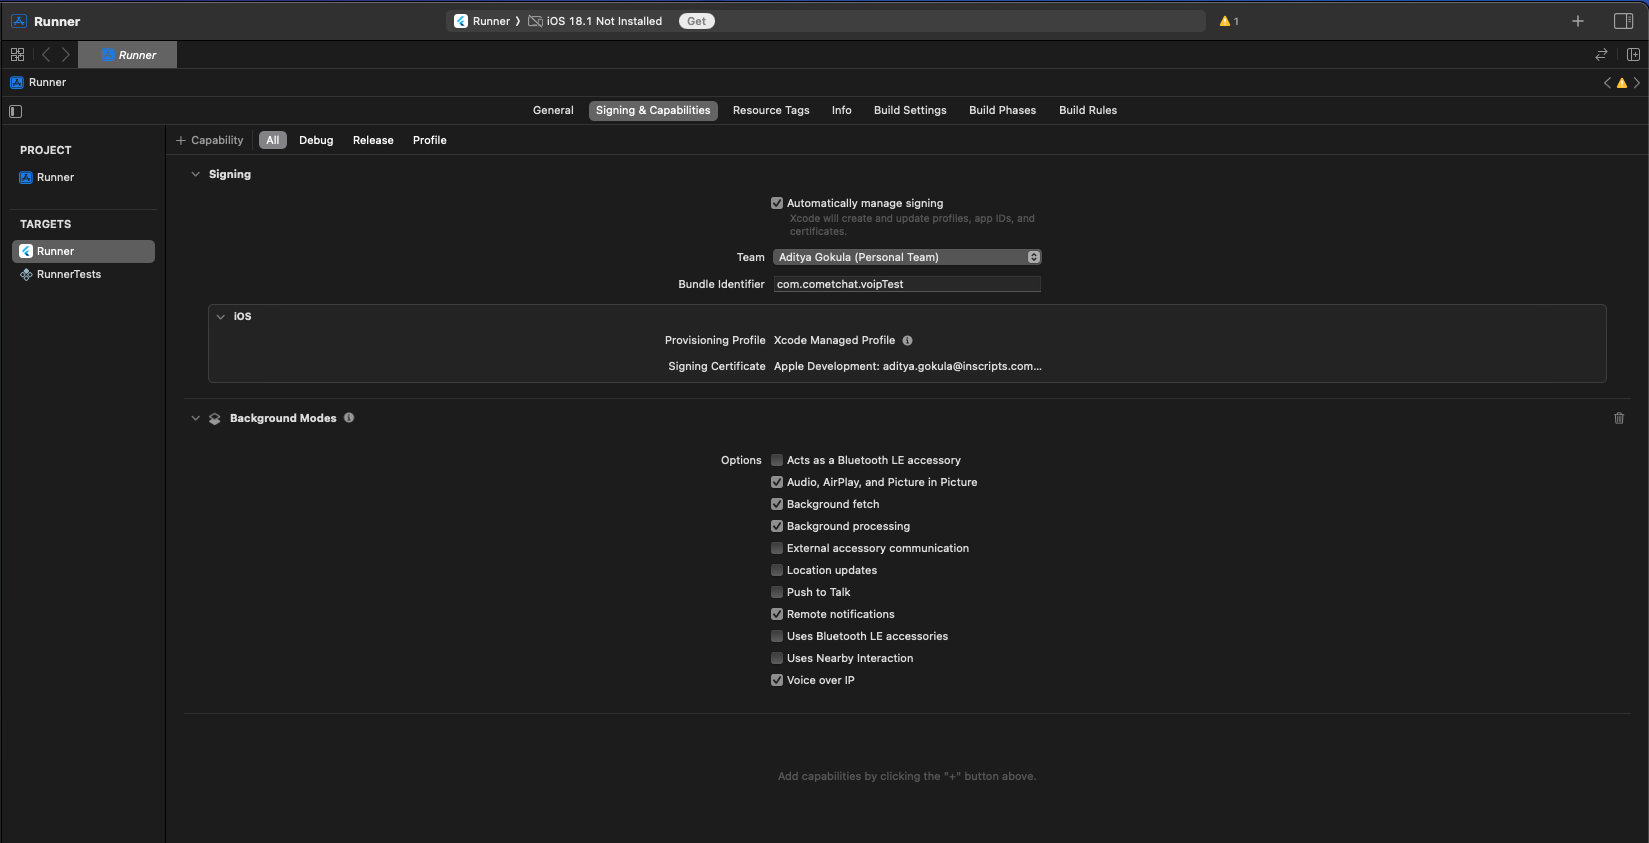
11. iOS App And Permissions Configuration
In the native iOS side, open Runner.xcworkspace file.
Check the GoogleService-Info file and check bundle.id is valid and matching with CometChat dashboard configuration or not. If not download it from Firebase Console and update it.
Click on Runner, in the Signing and Capabilities turn on the toggles as shown in the below screenshot -
In the Info section add 2 permissions, i.e Microphone and Camera. After adding the Info section should look like the below screenshot -

To test the app in the killed state in iOS, run the App in PROFILE or RELEASE mode through FLUTTER. To run app in profile mode run the following command in Android Studio terminal -
```dart
**flutter run --profile**
```